
Origin
zhuanlan.zhihu.com
Tags
简悦
项目
收藏夹
创建时间
收藏类型
Cubox 深度链接
更新时间
原链接
描述
因为一些工作上的需要完整翻译了育碧多伦多团队的 TA Emily Zhou 和图程 Colin Weick 在 GDC 2022 上带来的分享:Simulating Tropical Weather in Far Cry 6,下面是 pdf 链接和原文演讲链接:
(吐槽一下图程老哥看起来没有怎么准备,感觉像是在念稿子)
因为苦于网上对这次分享的翻译并不多,并且有一些细节在大部分翻译中并没有被提及,而且部分翻译中存在一些错误,所以对完整的演讲和 ppt 内容进行了翻译,所以内容将会非常非常多(流量预警)。
由于本人的技术水平和英语水平非常有限,在翻译过程中,也参考了一些前人的翻译工作或笔记,如果需要快速了解其中的一些内容也可以查看:
为了更好的传达原作者的意思与避免由于本人水平不够导致的翻译或理解错误,这里把演讲时作者的英语原话附在了每一个 Slide 的上方,方便大家查看。
下面就是全文内容,可以图片和文字配合一起食用~
0. 参考场景与核心目标
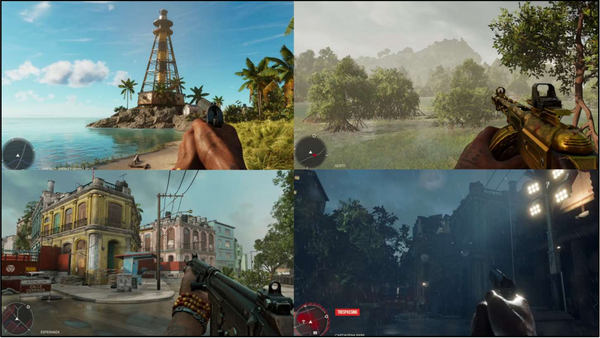
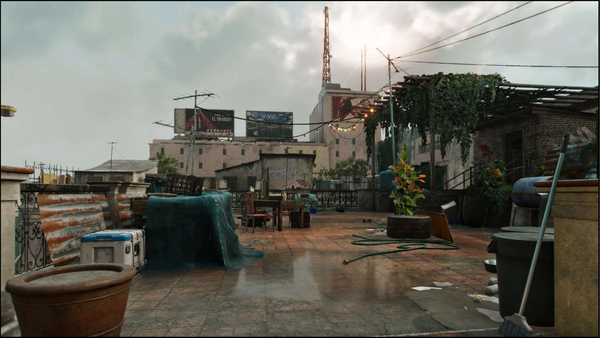
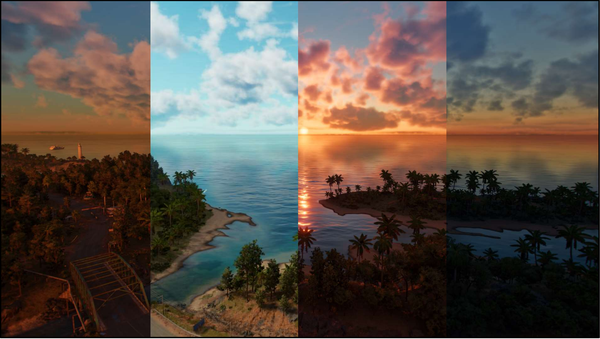
每一代 FarCry 的剧情都会在一个不同的环境下展开。这一代故事发生在一个名为雅拉的热带小岛上,雅拉的原型是古巴。FarCry 的每一代开放世界都有自己的特色,本作的特色就是热带风情,要给玩家完美地展示热带风土人情,全动态的天气系统是必不可少的。
为了较好的呈现出古巴的热带地区效果,制作组首先调研了古巴不同天气的表现:标志性的热带晴天以及雷电和暴雨,并在游戏中模仿出几小时内的天气迅速转变。

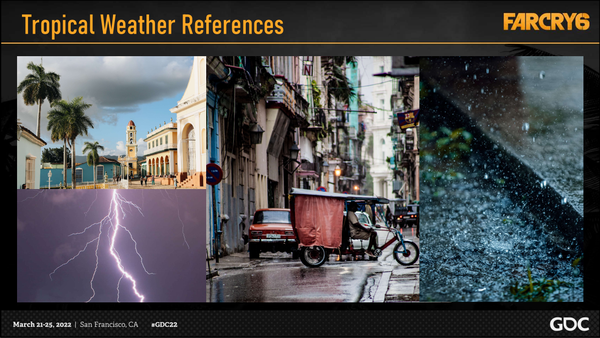
以上的这些特征,都是想要着重表现的,上面的参考被吸纳进了他们的概念设计中,这张图是早期的概念设计图。
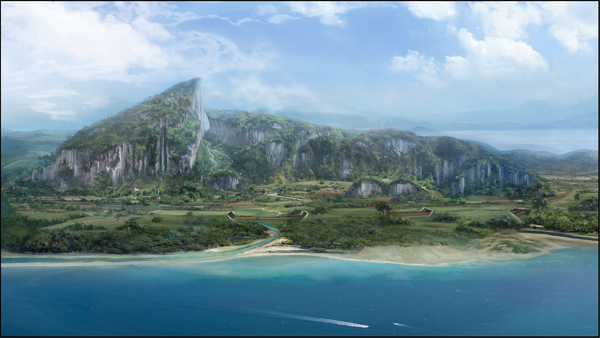
他们的艺术总监想要打造一种不祥的氛围,包含非常美好的热带天气与之对比强烈的雷暴雨天。

想要营造一种置身于暴雨中的感觉,令人信服的雨和湿润效果是必不可少的。
同时,海洋对于一座小岛来说,也应该是一个关键的部分,天气系统也应该对其有所影响:

基于此,我们可以把这些美术表现上的方向,转换为天气控制的具体目标:令人信服的天气状态、动态天气、自然的状态间转换、高效。
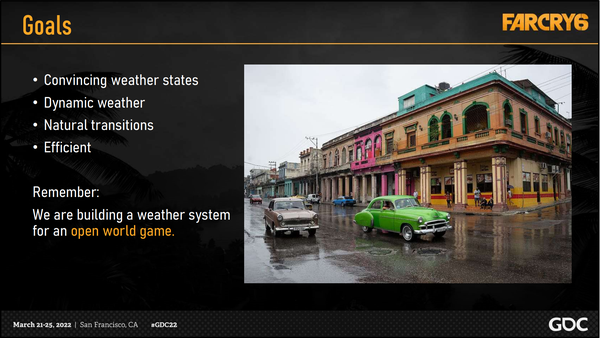
①.We want to have a collection of different weather states. 有一系列的天气状态可以配置
②.We want the weather to be dynamic and varied. We want a system where the transitions make sense. For example, a storm should be preceded with darkening clouds and followed by remaining water puddles. 天气是动态且多样的,天气系统对天气的转换需要合理,比如一场热带风暴会伴随着偏黑的云并在地表产生积水。
③.And of course, everything needs to be efficient and fit within our budgets. We must emphasize here that this weather system will be for an open world game. Our decisions are often influenced by data and performance budgets, and the need to support all times of day and all locations in the world. 天气系统需要高性能,满足性能预算,同时支持所有地点和所有时间(TOD,Time of Day)。(设计的天气系统是针对开放世界的,开发者会在对数据和性能的考虑下做出决定)
1. 天气系统的核心控制 - Weather Manager
The weather manager is the core code for our weather system and is what essentially drives weather behind the scenes.
It contains information used to define and control weather, some of which is exposed as settings in our weather database.
天气系统的核心(代码)是 Weather Manager,用于驱动天气的变换,里面包含了一些定义并控制天气的关键信息,其中的一部分作为(可)设置(参数)被暴露出来,这些信息是天气数据库(Weather Database)中的一部分。
Weather Manager 本身是一个在场景背运行的代码(back-end),而在编辑器中展示的(front-end)则是 Weather Database,即暴露给美术的各种天气设置。
Weather Manager 中有多项前置设置(setup),首先是:
1.1 天气预设数据(Weather Presets):
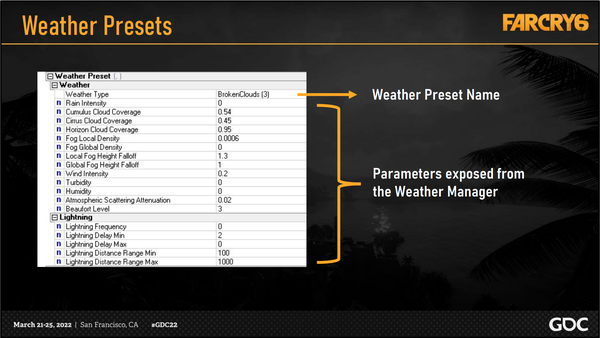
The collection of weather types is referred to on the project as weather presets. These are defined in the weather database using the exposed parameters from the weather manager.
To get an idea of what we can achieve with these parameters, let’s step through some of our final presets and compare a few of their values.
具体的一些天气类型,在 Far Cry 项目中被定义为 weather presets,这些数据对应着 weather manager 的对外暴露的参数,并定义在天气数据库中。可以看到有雨的强度、各种类型云的覆盖率、各种雾的强度、风的强度、浊度(turbidity)、湿度(humidity)、大气散射衰减、蒲福风级(Beaufort Level)等气象数据,以及闪电(Lightning 不是 lighting,不是光照)的距离、频率、延迟等数据。
为了对这些参数能够达到的效果有一个概念,可以几个最终预设的部分值进行比较。
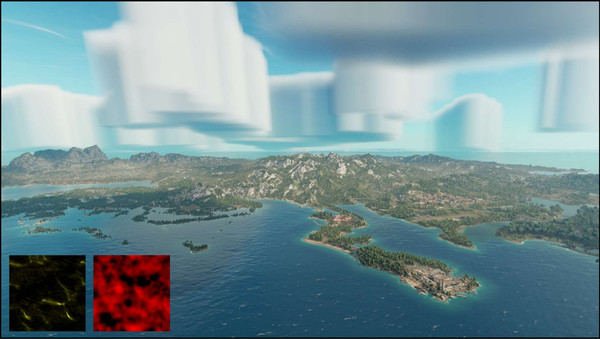
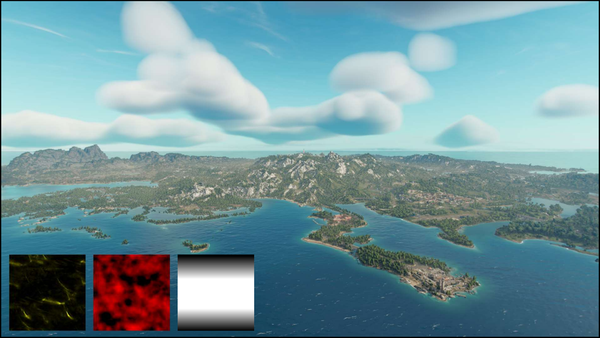
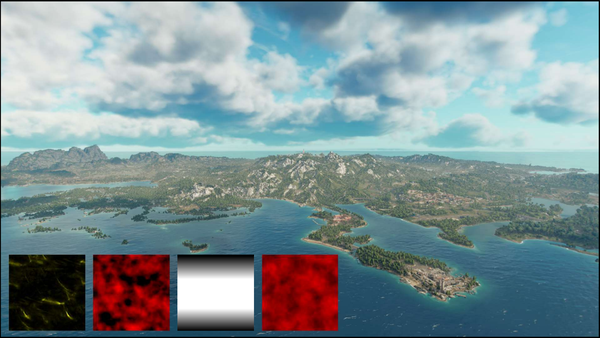
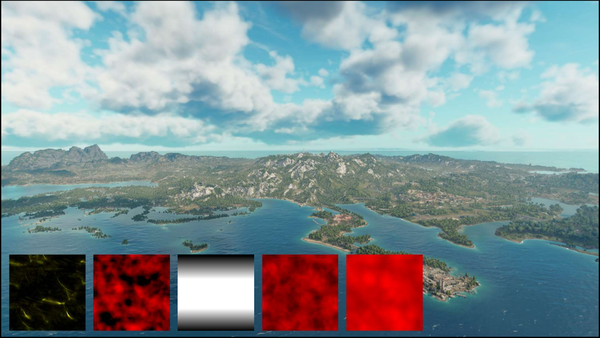
以云的参数为例,下面的一系列图片展示了从 Few Clouds→Broken Clouds→Mist→Fog 的变化,可以看右下角的参数变化:
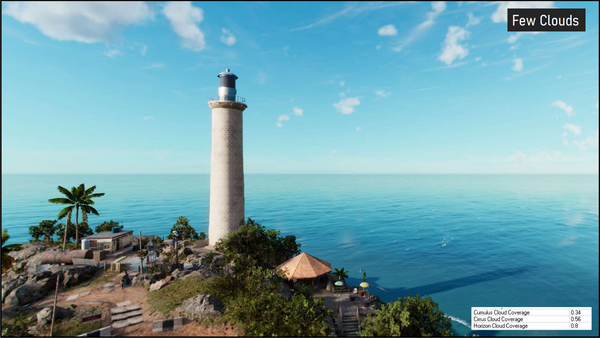
For the Few Clouds preset, we used low cloud coverage values, shown in the bottom right. 在少云的情况下,使用了较低的云覆盖率参数
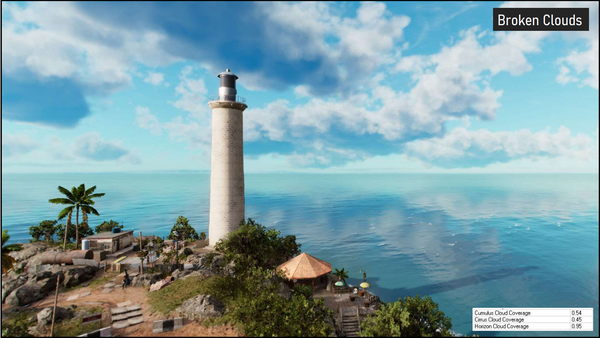
In comparison, the Broken Clouds preset uses higher cloud coverage to give us big fluffy clouds. 在此预设下,云的覆盖率就更大,而且显得更蓬松
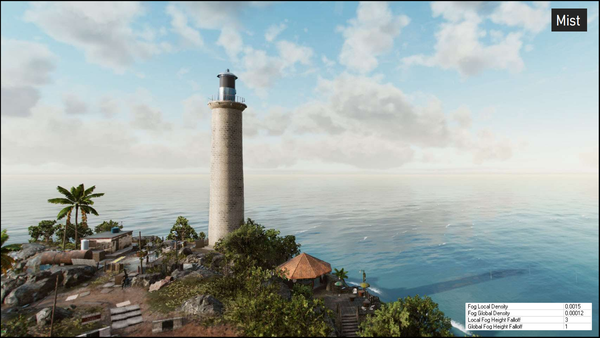
Next we can see that the Mist preset has added light fog in the distance. 该预设下有一层淡淡的雾
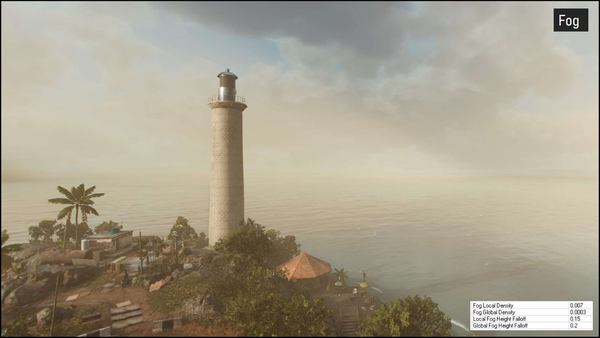
In comparison to that, we have our heavy Fog preset, with fog values cranked up much higher. 浓雾预设下,fog 相关 value 更高。
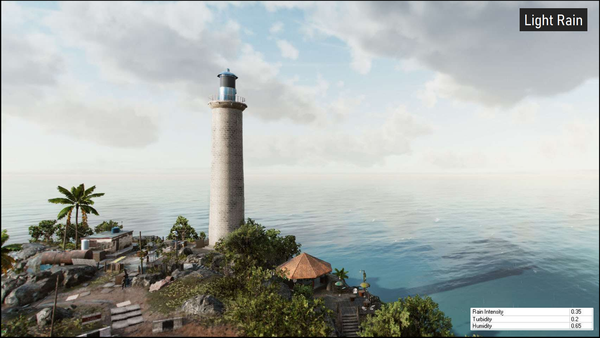
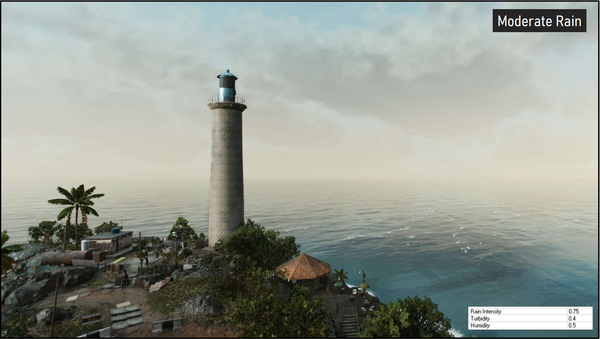
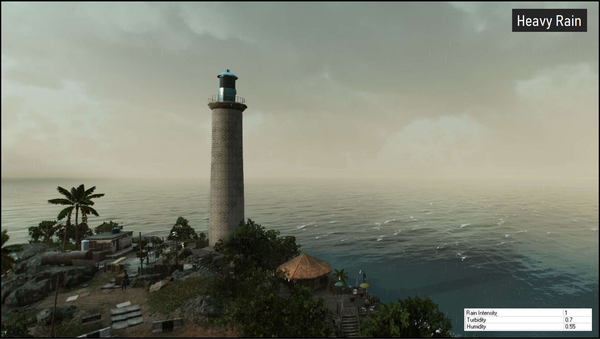
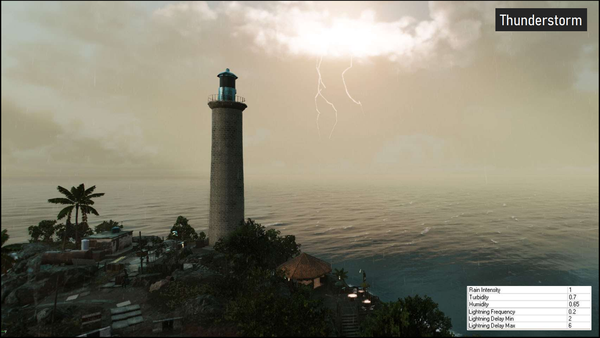
以雨的参数为例,下面的一系列图片展示了从 Light Rain→Moderate Rain→Heavy Rain->Thunderstorm 的变化,可以看右下角的参数变化:
1.2 气象规律与分区
Now that we have weather preset building blocks, we need to create a cycle or weather pattern.
In the very beginning, our initial idea was to collect and use real world meteorological data from cities such as Miami. As shown in the image, we obtained the description of the weather at every hour from a period of time 2013.
Although it would have been nice to use real world data to drive our forecast, we wanted more artistic control.
The method that we ended up going with was a similar text file, but we timed our chosen weather presets ourselves, and designed up to 5 full day cycles per region. This freedom also allowed us to showcase our weather presets where they looked the best!
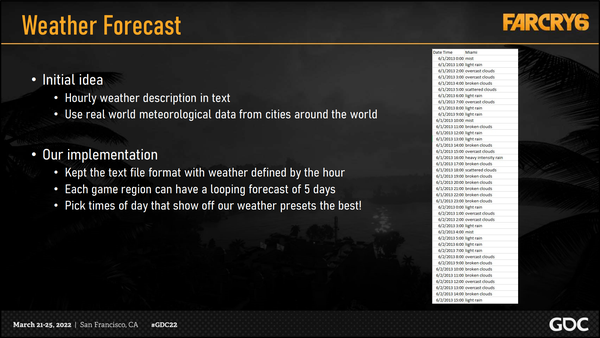
有了对天气属性的预设,就需要创造天气的循环或特定的天气规律。在早期(Initial idea),制作组想要收集并使用真实世界的气象数据(例如迈阿密),例如上图就是 2013 年一段时间内的每小时天气。尽管使用真实数据来进行天气预报的驱动,但制作组想要一个更艺术的控制形式。
最终的实现(our implementation)也使用了类似的文本文档,但是使用了制作组标记了自己所选择的天气预设,并为每个区域设计了一个五天的循环。这样制作组就可以用表现最佳的形式来制作天气预设的展示案例。(这里也是 weather database)
刚刚提到了区域,因为 FC 本身有三种不同的区域:
Now we need to take some time to discuss regions. The world of Far Cry 6 has been subdivided into 3 main regions, West, Central and East, each with it’s own visual identity.
The west was the dry region, central was the wetlands, and the east was the jungle region.
To enhance these distinctions, we wanted our weather to differ between each region.
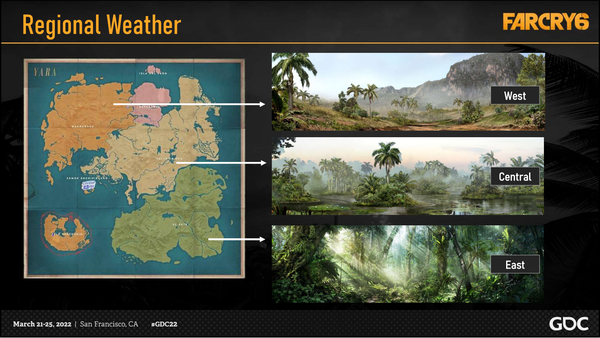
FarCry6 的游戏地图由东部岛屿、中部岛屿、西部岛屿三部分组合而成,每个地区都有自己的视觉特征与气候特点,西部是比较干的区域,中部是湿地,西部则是雨林。为了强化这种表现上的区别,天气系统的表现在不同的地区也需要有对应的修改。
游戏运行时,首先查阅天气预报,以获得当前时间的天气预设。然后根据玩家所在的位置,应用区域调整机制,得到当前的天气状态。这个状态可以在游戏运行时重写,以保证根据具体需求动态调整。
Note that our definition of regions also extends to smaller zones, such as interiors, caves, and anything else that artists might need to define.
For each region, we exposed min and max curves to limit certain weather properties. This was how we altered weather based on where the player is moving in the world.
An example usage case would be how we set the max fog curve to 0 for the indoor zone, to prevent fog from appearing inside.
The limitation to this is that, if your indoor area has windows, you would see the fog disappear outside as soon as you walked in. This was why we assigned our zones carefully.
Our weather manager then took in all the potentially overlapping regions around the player, and interpolated the curves accordingly to output the adjusted weather.
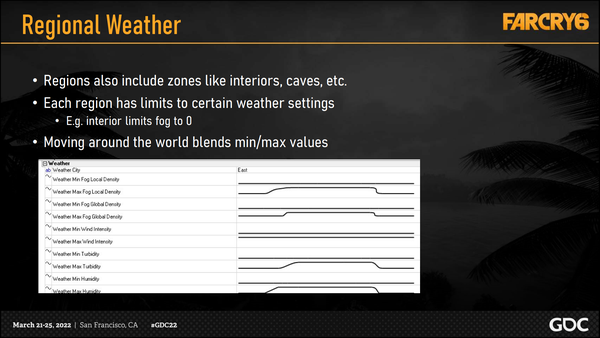
值得注意的是,区域不仅是大的三个分区,这些小区域也引入不同区域不同天气的概念。这些小区域有室内、洞穴以及其他任何可能被艺术家定义的地方。
对于每一个区域,都设计了最小和最大的天气出现概率的曲线。例如将室内区域的最大 fog 曲线设置为 0,防止雾在室内出现。这是根据玩家在世界中移动的位置,修改天气的方式之一。
这样做的限制是如果当前室内区域有可以看到外界的窗户,玩家一走进来,会看到外面的雾气消失。因此不管是策划还是美术都要注意,有窗户的室内场景的摆放与设置,防止穿帮。
weather manager 将玩家周围所有可能重叠的区域纳入计算,并把相应曲线进行相应的插值,以输出调整后的天气。
1.3 运行时的天气控制
The weather manager also needed to allow for overrides, such as for gameplay missions and prerendered cutscenes.
For example, the opening mission of the game has the player fleeing through the city streets in the middle of a nighttime thunderstorm.
Additionally, our game is available in multiplayer co-op, so weather needed to be replicated for all players.
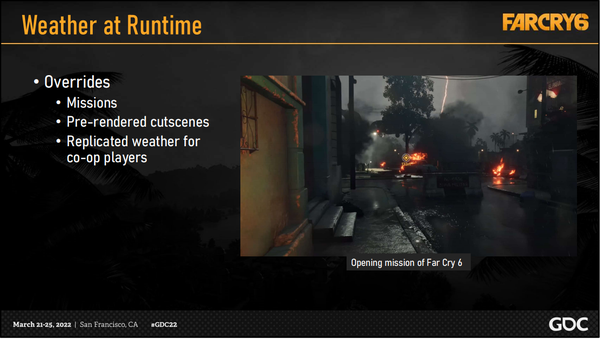
weather manager 在默认循环的配置的下需要支持覆盖,因为有的特定游戏任务和剧情过场动画需要支持特定天气,例如游戏的第一关就是玩家在半夜的风暴中逃离城市的街道。另外,FC6 支持多玩家合作,所以天气需要能够同步复制到多个玩家的客户端上。
This flow chart illustrates the final order of operations.
To summarize, we first consult the forecast to get the weather preset at the current time of day. Then, based on where the player is, we apply regional adjustments. This gives us the current weather state, which can be overridden for gameplay.
Finally, we use this weather state to update the wetness, rain and lightning with time, and output the final parameters. These are variables like WetnessFactor, RainFactor, etc., which we can now access to drive visuals, audio, gameplay and so on.
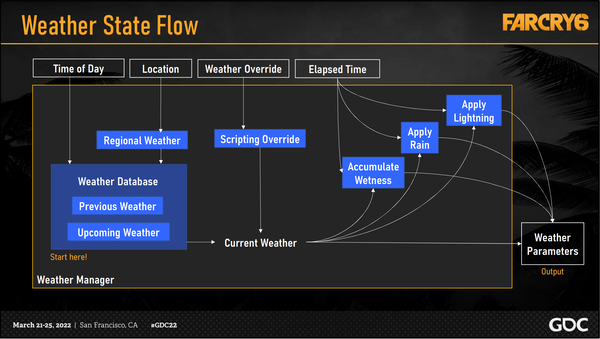
上图展示了气象状态变化(flow)的更新过程。
总结一下,首先根据具体时间(TOD)获取自定义的 5 日预报信息中的天气信息。然后,根据玩家所在的地点,通过曲线施加地区性的调整,来获得当前的天气状况。但这个阶段获取的天气状况可能会被 gameplay 中的特定事件覆写。
即首先从 weather database 中获取基本的天气数据,再通过所在地点的区域曲线去修改基本天气数据,得到区域某一时间点的天气数据。如果 gameplay 需要特定的天气表现,就会去修改该区域某一时间点的天气数据,得到最终的 “current weather”。
最后,通过当前确定的 current weather 数据,在运行的持续时间中(理解 Elapsed Time、CPU Time、Wait Time),修改湿度、雨、闪电的参数,并输出最后的天气参数变量,例如湿度因子 WetnessFactor,雨因子 RainFactor,来实际的去修改视觉、生效和 gameplay 等待事件。
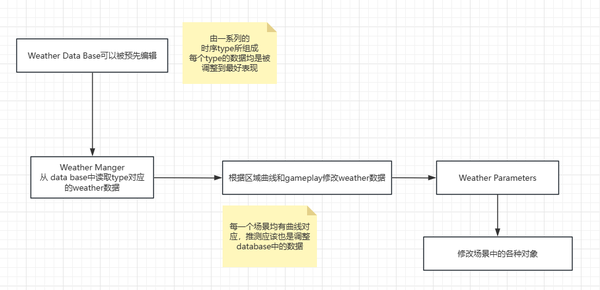
根据上面的内容,初步总结的 Weather Manager 的流程图如下:
2. 湿润材质以及实时湿润
湿度是天气带来影响的一个重要部分,这一部分的内容将分析 FC6 是如何将湿润应用到各种不同资产上的,包括静态物体、动态物体、角色、武器、车辆、植物、地形等等。
Wetness is a huge component of weather; when it rains, we need to see the world change. This means that every asset needs a wet state, so that we can blend between dry and wet.
The risks associated with creating a wet version of every asset are:
- There are too many assets, so requiring extra data will add a lot of production time
- Our art teams all have their own asset pipelines and shaders. We could be risking a lack of cohesion, which would be hard to control given our project’s scale.
Our solution was to work in parallel with asset creation. To do this, it needed to be simple and unified as much as possible.
We also decided that it would be primarily tech-artist driven and it should work "out of the box“.
This means that we should be able to drag and drop assets in the world, and they should get wet in the rain. Of course, some materials receive more detail and polish, but for the simplest props or legacy assets, wetness should work without revisiting them.
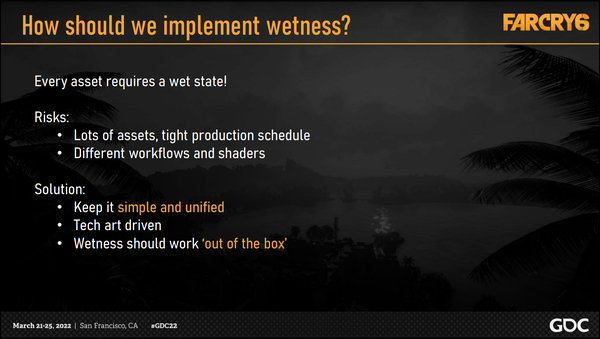
湿度是天气的一个重要的组成部分,当下雨的时候,我们需要看到游戏世界的变化,意味着每一个资产都需要有湿润状态,这样才能在干与湿之间进行切换。
为每一个资产创建一个对应的湿润材质有以下风险:
- 资产非常多,为了湿润材质添加额外的数据会增加大量的资产生产时间。
- 美术团队都有自己的资产管线和专用 shader,在实际开发时会使用各自的环境进行操作。鉴于 FC6 的规模,很难保证不出现冲突。
最终的解决方案是并行的进行资产创建,为了达到这个目标,流程需要做到简单和统一,主要由 TA 来进行推进,并且所有的湿润资产要做到开箱即用,也就是说:
资产拖进场景就能受到湿度影响。当然,有些材质本身需要使用湿度来控制更多细节,这种材质不在讨论范畴内。
First and foremost, we split our solution into two parts by having two wetness types: Static and Dynamic
As their names imply, static wetness is for objects that will never move, and dynamic is for objects that will move.
Static wetness applies mostly to our Object Bank assets which includes props and structures.
The wetness level is determined by using the WetnessFactor parameter provided by the weather manager. We also use a wetness shadow map to mask out wetness where appropriate.
Static wetness will be the simplest visually, and will be applied in the deferred lighting pass, which means it will be applied in one place,
The pros to static wetness is its simplicity and the fact that everything can be tweaked at once. But the con is that there is no flexibility.
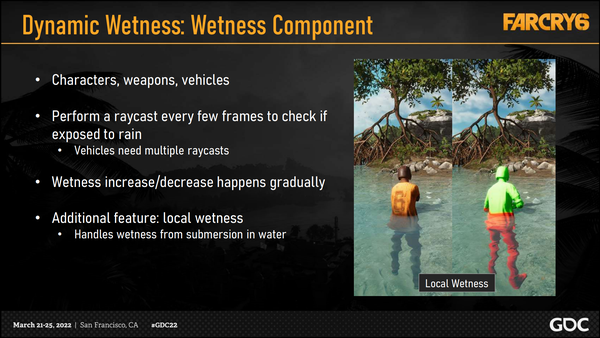
Dynamic wetness is reserved primarily for weapons, vehicles, and characters. Their wetness level is calculated by raycasts to detect exposure to rain. Their wetness also includes a bonus feature called local wetness which handles submersion in water.
For dynamic wetness, the visual change will be applied in each individual shader; which means that we can tailor the look a bit more.
The con to this is that we have to manage every shader that could be used for dynamic assets.
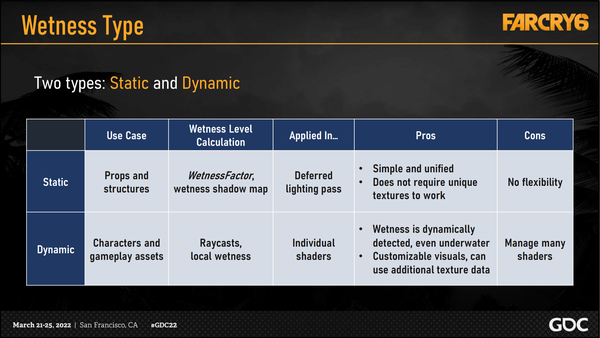
首先,FC6 的方案将湿润分为两种类型,静态湿润和动态湿润。
静态湿润指的是不会移动物体的湿润状态,在 FC6 的资产库中,通常是 props(道具)和 structures(建筑结构),湿润等级是由天气系统提供的 WetnessFactor 来决定的,同时使用湿润阴影贴图来标记出哪里是合适的湿润区域。
静态湿润在视觉上比较简单,会在延迟光照 pass 中进行应用,意味着静态潮湿会在这一阶段进行统一渲染。静态湿润的优点简单,所有的东西都可以一次性调整,缺点是不够灵活。
动态湿润主要在武器、载具和角色设计的。强度取决于两个参数,第一个是通过 Raycast 计算在雨水中的暴露程度,第二个是在水中的淹没程度,淹没程度是一个额外的特征,是一个由 local wetness 参数设置的。
动态湿度的计算是放在单独的 Shader 中进行的,这意味着可以进行更多的定制。这种方法优点是动态、可定制,缺点是需要管理额外的 Shader。
2.1 静态湿润材质
First, let’s look into the static wetness type. The main wetness calculation needed is the wetness shadow map, which occludes objects that are, for example, under a balcony or indoors.
This is important because we reuse our props, so their wetness should be accurate no matter where they are placed.
Since our static wetness is applied in the deferred lighting pass, we stored the wetness shadow in our deferred shadow pass.
We then multiply the sampled shadow with the weather manager’s WetnessFactor to get the final wetness.
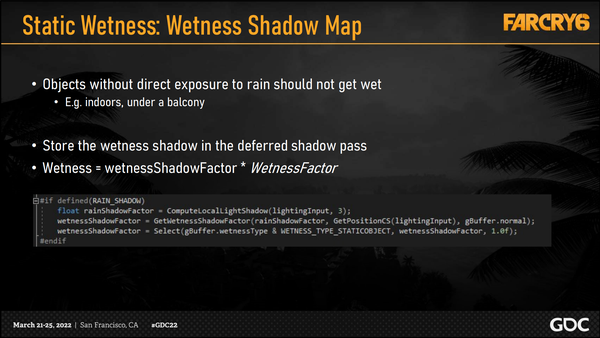
静态湿润材质的计算需要考虑遮挡关系,主要通过湿润阴影贴图实现,他遮挡了诸如伞内和室内的物体。
使用湿润阴影贴图的一个原因是,制作组会重复的使用一些道具,所以无论它们被放在哪里,它们的湿润度都应该是准确的。
由于静态湿润在延迟灯光通道被应用的,所以我们将湿润度阴影存储在延迟阴影通道中。然后我们将采样的阴影与天气管理器的 WetnessFactor 相乘,得到最终的湿度。
想象雨水是一束平行光,那么处于阴影中的物体就不会被淋湿。Wetness Shadow Map 会在 Deferred Shadow Pass 被计算,然后在 Deferred Lighting Pass 中被使用,就跟阴影的使用方法一样。采样 Wetness Shadow Map 之后再与 WetnessFactor 相乘就可以得到最终的湿度。
在代码中,先通过垂直打光计算出雨的阴影因子(rainShadowFactor),再通过位置、法线得到潮湿因子,再通过 type 选择得到最终的潮湿因子。接下来可以看看相应的例子:
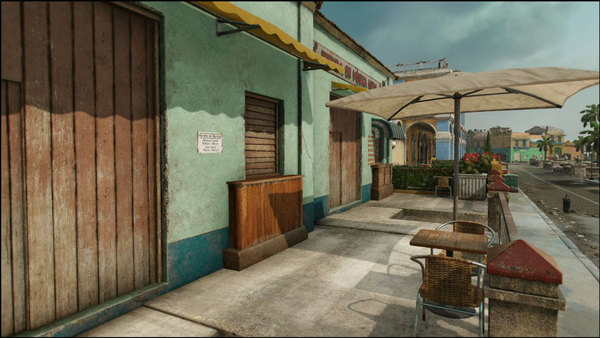
Let’s look at a wetness shadow example. In this scene, there are lighter, dry areas on the concrete floor and on the wooden table.
这是一个 Wetness Shadow Map 的例子,图中显得更亮更干燥的区域就是位于 Wetness Shadow 之中的部分。
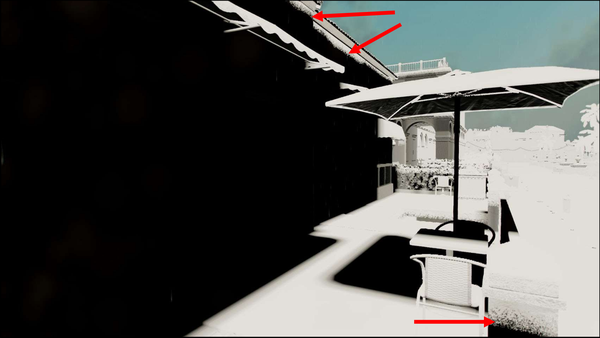
Here is a visualization of the wetness shadow. As you can see, it works quite well, but there are some precision limitations, particularly on vertical surfaces.
If you look closely at the highlighted areas, you will see some speckled details. This is because the cutoff was originally a harsh line, which we softened using dithering.
这个是 Wetness Shadow 的 Debug View,很多地方都能起作用,但是近乎垂直的面会有精度问题。为了处理这种问题每一帧都会略微 Dither 一下,这样就会从硬切的边缘变成图中这种较柔和的边缘,更加贴近自然。
Now let’s move on to how we applied the visual of static wetness.
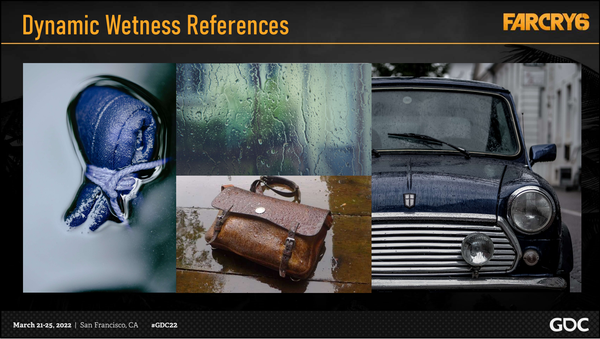
We first referred to photo references to analyze what inputs we would need and what changes they would drive.
The two visual changes that we identified as necessary were darkening the albedo and increasing the smoothness. Some materials like cardboard would darken but wouldn’t get too shiny. Materials like tiles would not darken but would get much shinier. Some materials fall in between. The key to all this was how absorbent the material was.
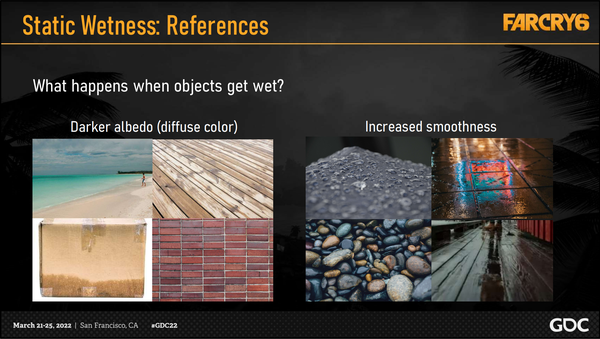
下面看一下如何在画面上表现出湿润的效果。这里是一些湿润物体的参考图,像沙子、纸板这种渗水性能比较好的材质在湿润后会呈现出更深的颜色,像石头、地砖这种渗水性能不是很好的材料就会表现得更光滑,更亮,当然还有的材质会同时呈现这两种效果。表现湿润效果得重点是我们怎么去描述材质的渗水性。
As a result, the input we chose was Porosity.
Porosity is most directly related to albedo change.
High porosity materials like dirt, fabric, and raw wood will become saturated and appear very dark.
Low porosity materials like plastic, marble, and metal will have water pooling on their surfaces rather than getting absorbed, which means that their colors should be unchanged.
Now that we have our input, we could just use a porosity map and move on.
Except for one problem - not every material can afford an extra texture map; that would exceed our budgets for not much reward.
So, we need a way to derive porosity whenever a porosity texture is not available.
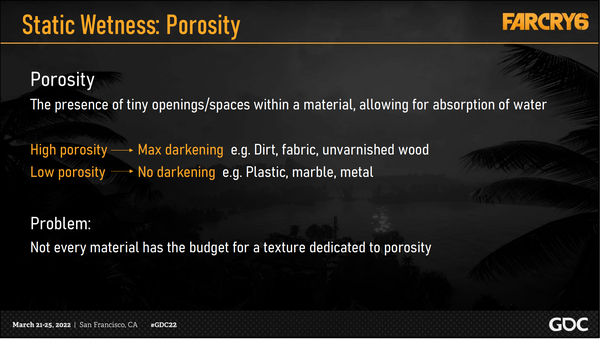
于是制作团队引入了渗透性(或译为孔隙度)这个参数来影响固有色(albedo 或 base color)的变化
高渗透性(容易被水渗透)的材质,例如泥土,纤维,原木等等会变得更饱和并且具有颜色更深的表现。
低渗透性(不易被水渗透)的材质,例如塑料、大理石以及金属等会使水聚集在它们的表面,而并不会吸收水,即它们的颜色不会改变。
该团队使用渗透性作为参数,并用了一个渗透性映射图(porosity map)
但并不是每一个材质都能够用一张额外的贴图,如果为了湿润效果多一张贴图,性价比会不太高。
所以需要一种不管指不指定渗透性贴图都能传递渗透性的方法。
This is where we introduce porosity factors. Since porosity and smoothness are properties that are conceptually connected, our solution was the following basic formula, where the two PorosityFactor values are floats that we could specify per material type.
This formula essentially generated a porosity map with all the details of the smoothness map, but with its values lying in the range that we curated.
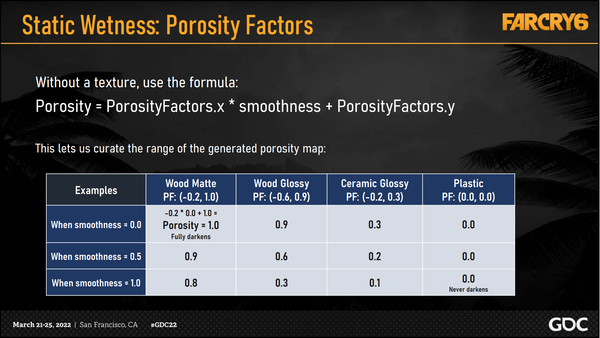
渗透因子和光滑度这两个属性在概念上是有联系的,FC6 团队的解决方案遵循上面的计算方式,渗透因子由两个 float 参数构成,可以为每一个材质设定。
这个公式可以通过 smoothness 贴图(即 1 - roughness)来生成一张额外的 porosity map,供材质使用,其数值在 FC6 团队所精选的范围内,可以参考上面的表格。
Luckily for us, our object shaders already had a dropdown of material presets with hardcoded PBR values. All we had to do was add in the porosity factors.
This kept the artist workflows unchanged and prevented any setup bugs.
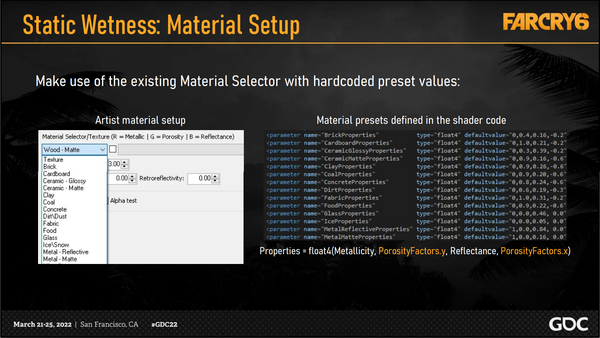
对于 FC6 团队来说 ,本来就已经有一系列预设的 PBR Hard Code 参数了,直接把 Porosity 也加了进去,这样甚至连美术管线也完全不需要动,在上图中,Texture 的 G 通道就是渗透性参数,定义了一组 float4 来承接渗透性因子的 y 和 x 维度。避免了一些设置问题。
Now that we have the porosity input ready, we can look at the central ApplyWetness function that is called from the deferred lighting pass.
The code can be referred to later, but what we essentially did was:
Darken the albedo according to porosity, except for if the material is metallic
Boost the smoothness, note that we used porosity again to get even more control
And replace the specular reflectance value with that of water
For an approximation with very few inputs, it would be impossible to get every material response correct.
It was more important to judge the bigger picture rather than individual assets. This helped us avoid an endless loop of tweaking values.
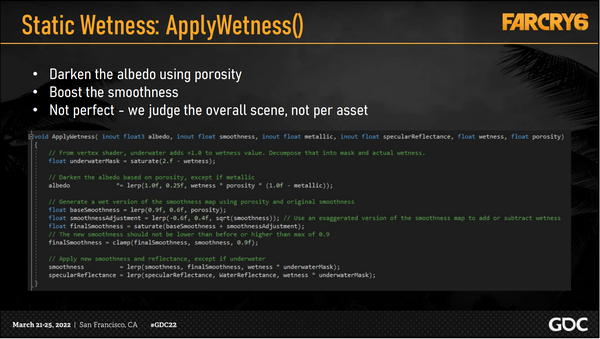
在前置输入参数 Porosity 已经确定的情况下,可以看一下 deferred lighting pass 里面的 ApplyWetness 函数。
这里主要做的是:
- 根据渗透性加深除了 metallic 材质以外的材质的颜色。
- 使用渗透性和原始光滑度生成一个潮湿版本的光弧度贴图。(通过渗透性得到更多的控制)
- 替换为水的 specular 反射值
除了上面提到的之外,还考虑到了淹没在水里部分的湿润影响,通过一个 underwaterMask 来操作,是在顶点着色器中标记的,这些部分的湿润值 + 1。
由于这里是通过近似手段做的,而且输入参数也比较少,很难让每一个材质都正确反应。
更重要的是看整体环境的响应好不好而不是专注到某些单独的资产上,可以避免修改参数的无限循环。
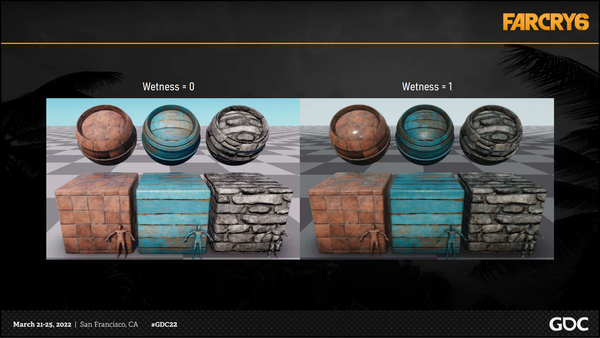
通过这个手段,得到了潮湿后的效果,可以对比一下:
2.2 动态湿润材质
Now let’s switch over to dynamic wetness, used for our characters, weapons and vehicles.
These assets all have a wetness component that keeps track of their wetness level.
Characters and weapons perform a raycast every few frames to check their exposure to rain. Since vehicles are larger in size, they will have more than one raycast.
When exposed to rain, dynamic assets will increase in wetness level slowly before they are fully wet and, when no longer exposed, they will also dry slowly.
The per-vertex local wetness calculation handled submersion, so if a character wades halfway into a lake, their lower half will appear wet.
动态湿润用于角色、武器和载具。
这些资产都有一个湿润组件来跟踪这些物体的湿润等级。角色和武器每一帧都进行一次 raycast(射线检测),来检测在雨中的暴露程度。由于载具的体积较大,需要多于一次的 raycast;
当暴露在雨中时,动态资产需要逐渐增加湿润等级,直到达到完全湿润;反过来,从湿润到干燥也是一个逐步变化的过程。
逐顶点的 local wetness 计算处理了淹没的情况,如上图,展示了角色一半都在水里的情况。下半部分的顶点显示为红色(干绿,湿红,这个区分后面还会用到)
Now, if we recall, the benefits of dynamic wetness was that we could customize the way we applywetness. To gather our ideas, we once again revisited real world reference, such as staring at parked cars outside in the rain.
动态湿润的好处之一就是可以定制化让物体变得湿润的方式,为了理清思绪,FC6 团队在现实生活中再一次汲取灵感,例如观察在雨中停的车。
For character clothing, we utilized the same approach as for our props. We used an existing dropdown menu in shader, but also added an upper limit to the final smoothness, to give us better results for wet fabric.
Character hair was the simplest change we made; we only used one set of porosity factors. At the early stages of brainstorming, we wanted a way for hair to clump together when wet, but it was too ambitious for our scope of work.
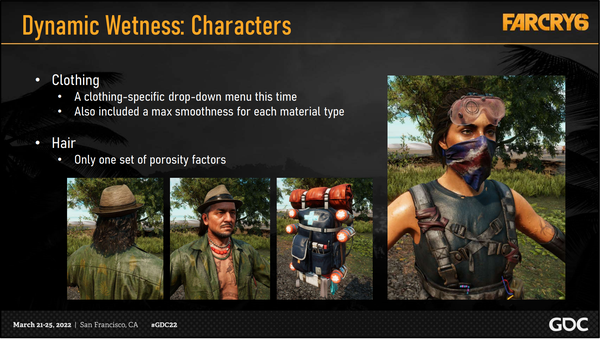
对于角色的服装,使用了与道具类似的方式。在 shader 中使用了一个已经存在的下拉菜单,但也增加了一个上限参数来限制最终的 smoothness,来为潮湿的纤维带来更好的效果。
头发的修改比较简单,只使用了渗透因子。在早期的头脑风暴中,FC6 团队还想做出潮湿时头发缠在一起的效果,但难度有点太大,对于他们的工作范围来讲太过于有野心。
For skin, we wanted rain to be visible, but not in a way where scrolling could appear unnatural or distracting. We went with a subtle approach by using a single and static texture, which contained a droplets normal map and a wetness mask. With these effects applied, skin material wetness was quickly finalized.
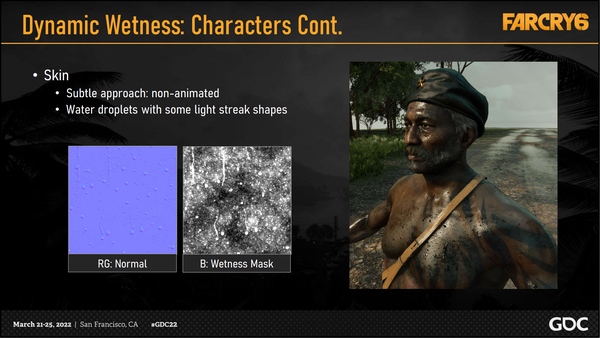
对于皮肤而言,希望雨的作用可以被看到,但流动要尽量自然。实现的方式比较巧妙,是通过一个单独的静态纹理,RG 通道包含雨滴的法线,B 通道存的是潮湿的遮罩。来得到最终的效果。
On our project, weapons and vehicles are closely related. They are both gameplay elements and are seen up close from the first-person perspective. For this reason, we gave these assets animated rain
effects, which were applied using animated textures updated per frame.
These effects were divided into two parts, streaks and droplets, which were applied on vertical and horizontal surfaces respectively.
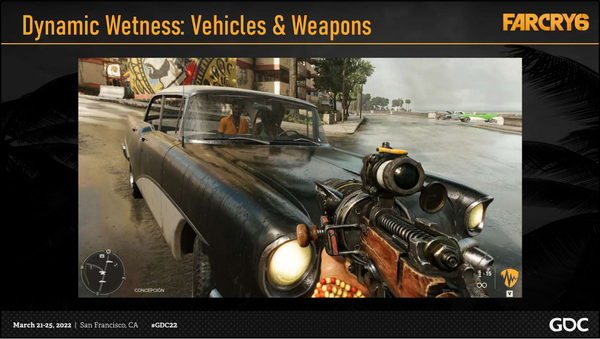
FC6 中,武器和载具有一定的相似性,它们都是重要的 gameplay 元素,并且会被玩家第一视角近距离观察。因此为这两种资产做了动态雨效果。通过动画纹理来每帧更新。
这些效果可以分为两部分,水的纹路(水痕)和水滴,分别在垂直和水平的方向进行作用。
For the streaks, our input data was only one texture, which packed in a streak normal map, a heightmap, and a scroll mask.
The scroll mask drove the vertical movement of the streaks, which we applied with local space UVs.
We made sure to only apply the streaks when the asset is oriented upright or upside down; in the latter case we reversed the scroll direction.
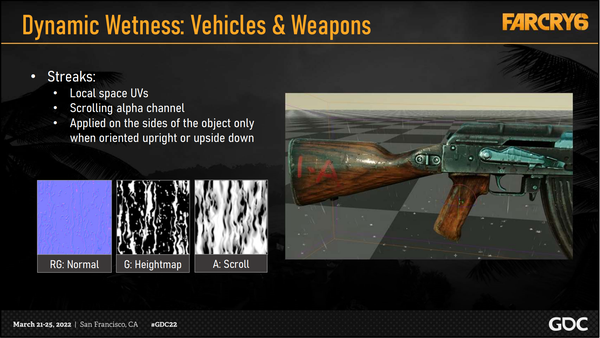
对于水痕而言,输入的贴图只有一张,其中 RG 通道存法线,B 通道(ppt 中有误)存 Heightmap,A 通道存的 Scroll 遮罩。
Scroll 描述了水痕在垂直方向上的运动,将在 local space UV 中起作用。按 Scroll 的 Local Space UV 采样 Normal 和 Heightmap,Scroll 纹理会被每帧更新。
确保仅在资产垂直放置以及颠倒时施加水痕效果。
For the droplets, we supplied another texture, containing a normal map, a heightmap and an ID map.
To drive the animation, we sampled the droplets two times to vary the pattern of droplets fading in and out with varying timing cycles, made possible with the ID map.
One thing we were still missing was the tiny static droplets that tend to build up over time on hard surfaces, so we managed to squeeze them into the heightmap texture later on.
We also made sure to use manual mips on the droplets texture to reduce sparkling artifacts.
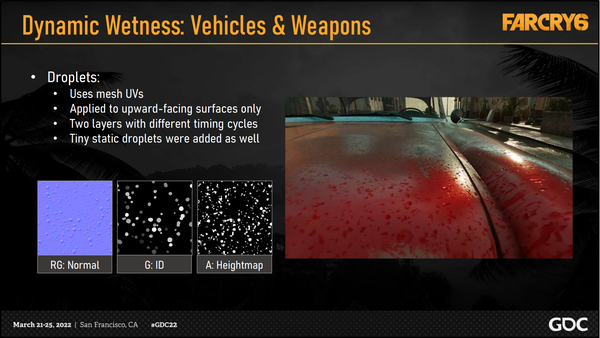
对于水滴而言,使用另一张贴图,包含了法线、heightmap 和 ID map。
为了驱动相关的动画,对水滴贴图进行两次循环采样来变化水滴渐隐和渐显的样式,是通过 ID 贴图来实现的。
即:ID Map 会每帧更新,按照 ID Map 采样两次 Normal、Heightmap 纹理然后做 Blend 就可以做出雨点产生和消失的动画。
还有一点就是小的静态水滴会在坚硬的平面上逐渐聚集到一起,所以随着时间的推移来挤压这些 “水滴” 到高度图中。
对于这张纹理,用自动制作的 Mipmaps 会导致闪烁的问题,所以改用了纯手工的 Mipmaps。
As we all know, adding a feature often results in unexpected issues and edge cases popping up. One issue we faced was that wetness effects were showing up inside vehicles.
This was because our vehicles sometimes share materials between the exterior and interior to save on drawcalls.
The fix for this was simply to use the red vertex paint channel as an interior mask.
Once this was painted by artists, we were able to remove the interior rain effects, except of course in edge cases such as when our convertible cars put down their tops.
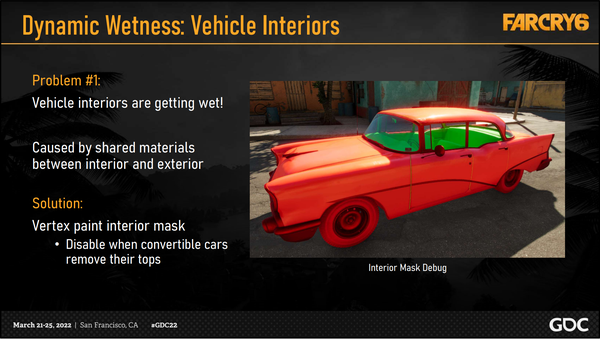
添加一个特性,可能会冒出来一些奇怪的问题。这里需要面对的奇怪问题就是车的内部出现了湿润效果。这是由于车的内部和外部通常共享材质来节省 draw calls。
为了解决这个问题,艺术家简单的用顶点色涂一下就可以了,红色的地方会湿润,绿色的地方不会湿润(淹没遮罩也是这样的),即在顶点阶段做了一下遮罩。
当然也会有敞篷车打开上面罩子的特殊情况,(这里也没说怎么处理)
Another problem came up when moving windshield wipers were implemented by our gameplay team, while rain streaks were added by our 3D team, resulting in no interaction between them!
What we did was pack in a windshield gradient map and set up the shader to mask the rain according to the current gradient value. We then passed this value over to gameplay to hook everything up.
This was a small feature that we never initially planned, but inconsistencies like this can take players out of an experience very quickly, so we were happy to add it.
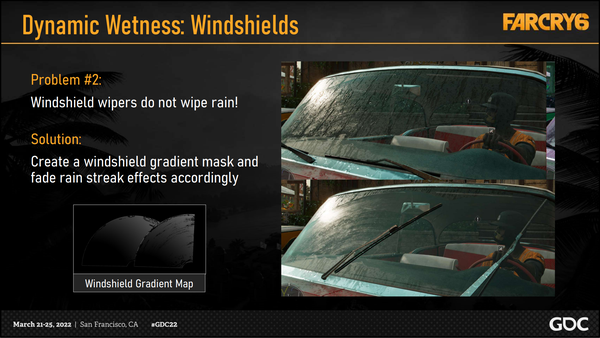
gameplay 团队做了一个雨刮器的效果,但由于 3D 团队一开始没有考虑到这一点,导致雨刮器和车玻璃并没有任何交互。
通过一张挡风玻璃的 gradient map(梯度贴图,或者是渐变贴图)来作为雨痕效果的 mask,shader 根据当前的 gradient value 来进行 mask,得到刮过之后的效果。
For vegetation, we originally used the static wetness approach but this led to two issues:
- Firstly, trunks and plants near the jungle floor were getting shadowed from the rain, which is strange to see in nature.
- Secondly, we were getting bugs explaining that the trees were appearing metallic. This was because the flat leaf cards were giving off a uniform reflection of the grey sky. This visual was so strong that it effectively reduced the realism of the trees by exposing where the cards were. To fix this, we converted vegetation over to the dynamic wetness type, just so that we could tailor the wetness in the shaders independently. Of course, this meant that there would no longer be any shadowing, but 99% of the time, our trees are not hand-placed indoors, so we went through with the swap.
We used a water droplets texture on the leaves, which finally matched reality a lot more and fixed the reflection bugs
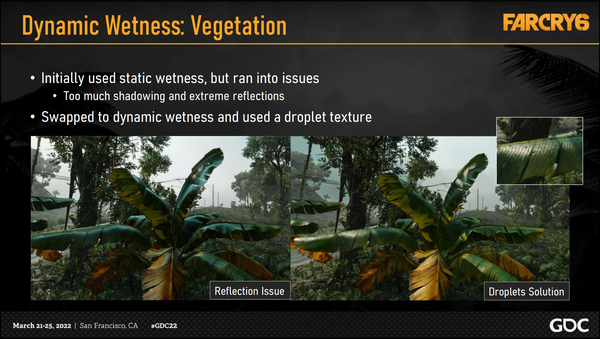
植物最开始使用的是静态湿润方法,但这样会有两个问题:
- 在丛林下层的灌木和植物由于被上层的植物所遮挡,导致不会受到雨水影响,这是自然界中看不到的。
- 静态植被的高光太亮,看着会像金属的质感,这是由于扁平的植物叶片(leaf card,在建模中用一个 card 代表叶片)会散发出统一的灰色天空反射。由于这个视觉特征过于强烈,导致树叶的 card 暴露出来,减少了树整体的真实性。为了解决这个问题,把植物变成了动态湿润,来针对性的修改他的 shader。这样,植被也不会被上层阴影遮挡。由于这些植被很少(1%)放在室内,所以也不会导致室内的植被湿润。
最终在叶片上使用了水滴贴图,使得结果更加真实,并解决了反射问题。
Terrain was the final area to conquer. Not only is it always in the player’s view, but as we can see from photo reference, it also requires far more detail.
Let’s first summarize very quickly what we need for our terrain. The primary textures used include albedo, normal, smoothness and, the new texture added for wetness, porosity.
These properties are stored in a virtual texture atlas that we use for the entire world. To see more about this system, you can refer to our past talk on our terrain system.
Note that roads and terrain decals are all baked into the virtual texture atlas, so it truly is one complete system that we need to apply wetness to.
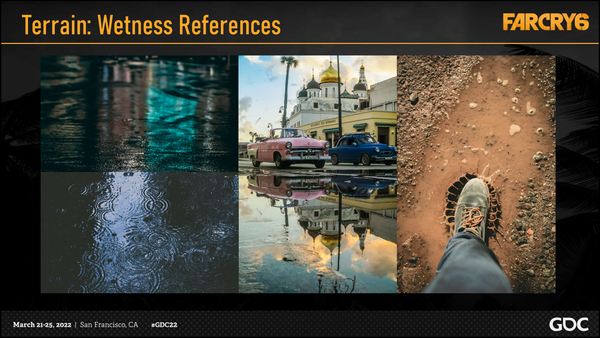
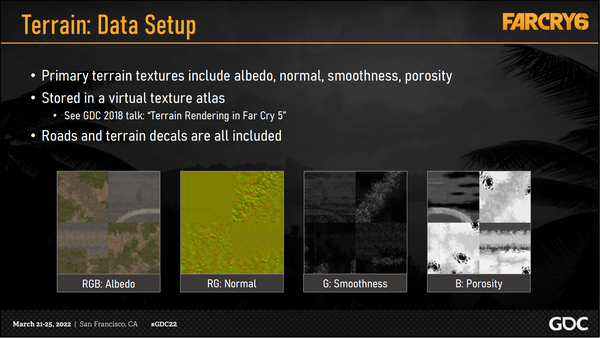
地形是最后一个要处理的模块,它一直在玩家的视野中,也需要更多的细节。(比如积水)
地形所需要的基础贴图包括 albedo,normal,smoothness 和 porosity(由 Smootness 算出)。这些属性都存在虚拟纹理图集中,并被整个游戏世界所使用。(可以看以前的 FC5 的地形渲染 talk 来获取进一步信息 [gdc18]farcry5 的地形渲染技术 - 知乎 (zhihu.com))
公路和地形贴画都被烘焙到了虚拟纹理图集里,所以我们可以在这个完整的系统上添加湿润效果。
To make terrain wet, we actually use the same ApplyWetness function shown for our static objects.
The key difference for terrain is actually the transition from dry to wet. We didn’t want a linear fade, as we thought this was a bit too artificial for such a large surface area.
The new transition we created was our raindrop splatter effect; as shown in the video.
To do this, a height field simulation was done on the GPU, which took in some parameters such as drying and spreading speed for the splatters.
The resulting animated mask was used as our custom wetness factor.
We also chose to temporarily increase the terrain porosity to accentuate the effect with darker splatters.
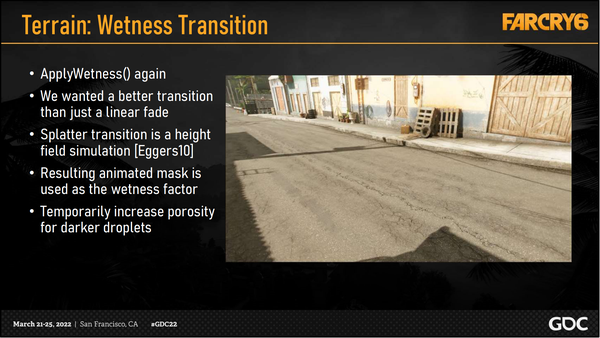
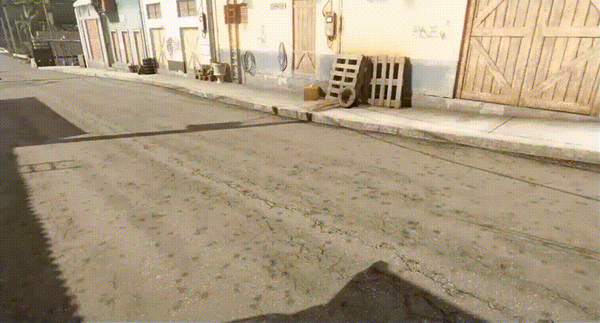
地形使用和静态潮湿一样的 ApplyWetness 函数来进行湿润渲染。
主要的不同是将地面从干到湿润的转换过程,区分于简单的线性过度(人工造假痕迹太重),使用雨点的扩散效果来让地表湿润。
为了达到这个效果,在 GPU 中执行了高度场的模拟,模拟接受干燥速度和雨点的扩散速度作为参数。
最终的动态遮罩可以用于湿度因子。
为了增强变暗的雨点的效果,选择了临时增强地表的 porosity。
Now that the terrain has it’s wetness applied, we must turn our attention to one of the largest visual features needed to present wetness: puddles.
Puddles were also a heavily desired feature for art direction because they would provide reflections, which ultimately makes the environment and lighting more appealing.
The setup for puddles was very simple. A puddle itself was a terrain decal, but all it contained was an alpha gradient and a checkbox to only write to terrain porosity.
The gradient served as a pseudo signed distance field (SDF), allowing puddles to build up from the center.
We only had a few puddle decals variation, which were scattered by our existing terrain and road recipe systems, similar to how cracks and potholes would be scattered.
We calculated the puddle wetness based on the terrain porosity and the PuddleFactor provided by the weather manager.
Once we had the puddle wetness, we once again altered the terrain’s gBuffer values accordingly.
We slightly blended the albedo to a muddy puddle color and blended the smoothness to 1.0. For the
normals however, we initially used a flat normal, but that brings us to our next implementation…
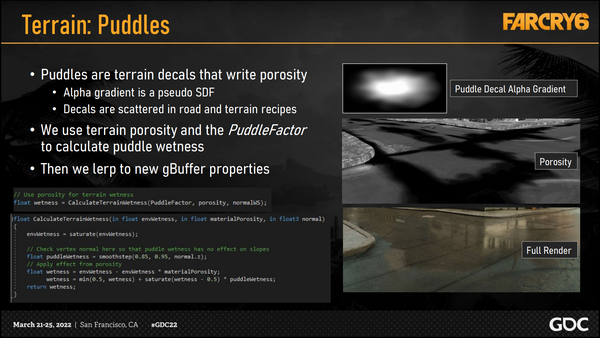
在地表湿润之后,最重要的视觉特征就是水坑。水坑是一个美术上的重要需求,可以提供反射,能够让环境的光照更加真实。
水坑的准备很简单,一个水坑本身是一个地形贴花,但它包含了透明度的渐变,还包含一个写入地形 porosity 的复选框。
渐变可以当作一个假的符号距离场(pseudo SDF)来用,让水坑可以从中心区域出现。
项目组只制作了几种水坑贴画的变体,被散布在存在的地形和道路上(通过特定的散布系统 recipe system,recipe 或许可以在这里译作花样或者搭配),类似于裂缝和坑在地面上的散布。
水坑的湿度基于地形的 porosity 和 puddle Factor(水坑因子)来计算,水坑因子由天气管理系统提供。在代码中,将湿润度限制在 0~1 范围内,然后根据法线方向得到 puddle 的湿度,最终的湿度由环境湿度和材质的 porosity 计算,并结合 puddleWetness 的影响。
在有水坑的湿度之后,就把 gBuffer 的 Albedo 变成泥泞的颜色,Smoothness 接近 1,Normal 变成垂直向上,来构成基本的水坑效果。
在基本的水坑效果之上,需要一些额外的效果:
The two types of puddle effects comprised of:
- Rain impact ripples, which are the circular ripples that simulate rain hitting the water, and
- Wind ripples, which are the small waves that occur when a gust of wind pushes the puddle surface.
It would be acceptable to have flat undisturbed puddles, but we wanted to take it one step further, and tie in our weather elements.
To do this, we generated a tiling animated texture, updated every frame, to be used for all puddles.
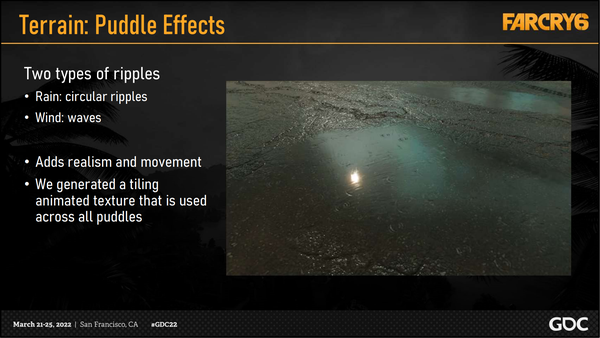
额外的效果包括两种:
雨滴在水面的效果,即雨打到水面上时扩散的圆环涟漪;
风吹的痕迹,带来水面上由风推动的小波纹;
出现纯平的水面是可以接受的,但是为了更进一步的表现,可以加上天气的影响。
为了实现天气影响的效果,FC 团队生成了一套动态贴图,每帧进行更新,可以被所有水坑所使用。
Our input data was a single texture with two normal maps packed inside, one for the rain ripples, and one for the wind ripples.
The output was a single animated normal texture.
For the rain ripples, we sample the normal texture twice to have two overlapping layers of flipbook animations. These are faded in based on the weather manager’s RainEffectsFactor, which will ensure that these ripples only appear when it is actively raining.
For the wind ripples, we scroll the texture based on the current wind direction and intensity. As a result, this effect can be present whether it is raining or not, such as when puddles are still on the ground just after a storm.
Finally, we blend these effects together to get the result that we use for our puddle normals.
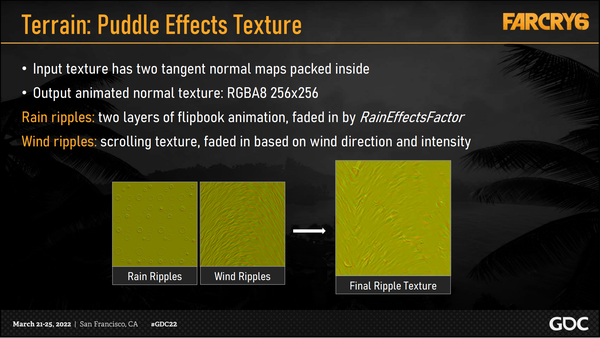
输入的单个贴图的四个通道分别包含两个法线贴图,一个是雨滴的涟漪,一个是风的波纹。
最终的结果是单个的混合动态 normal 贴图。
对于雨滴涟漪:涟漪效果是帧动画,每帧按照序列替换一张新的纹理(采样两个 normal 两次得到两个重叠 flipbook 动画的 layer,它们会逐渐消散),强度受 Weather Manager 的 RainEffectsFactor 影响,确保降雨时才会有雨滴涟漪。
对于风的波纹:是一张滚动纹理,受风的方向和强度控制,并不受降雨的控制,有风时就可以有这种波纹,比如暴风雨之后。把两张纹理组合起来得到 Ripple Texture,再把这张图应用到水坑的渲染上。
以上就是天气系统带来的潮湿影响的各种方面。
3. 天气相关的特性渲染
接下来看看动态天气渲染需要的渲染特性(Rendering features)
But first let’s take a look at the technical constraints we had.
Our game shipped on 9 platforms, spanning multiple console generations as well as PC.
We were aiming for 4k 60fps on next gen and 30 fps on the previous gen.
This was also our largest open world for the IP to date.
As Emily mentioned, we have a full day night cycle and an open-world which features indoor and outdoor environments
And now we need to do all of this with dynamic weather .
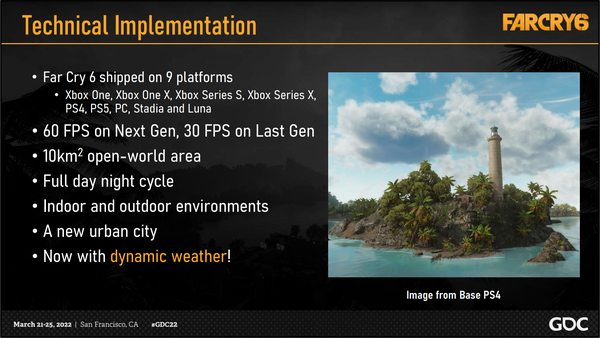
实现的渲染特性需要满足的目标如上图所示,FarCry6 会在 9 个平台上发布,除了 PC、上世代和次时代主机,还有 Stadia、Luna 两个云游戏平台。次时代的主机要求 60fps,上世代 30fps。地图大小 10 km2。支持 TOD、有各种室内室外场景、一座大都市。现在还需要处理完整的昼夜循环,以及开放世界室内室外环境。
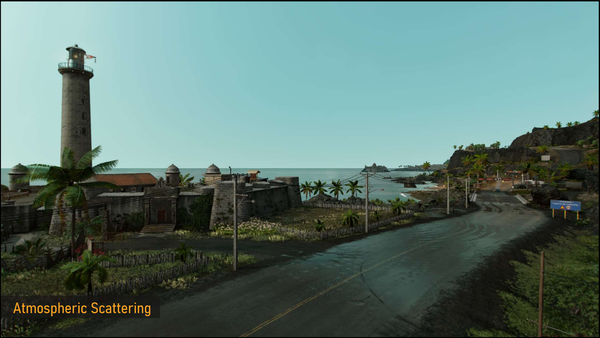
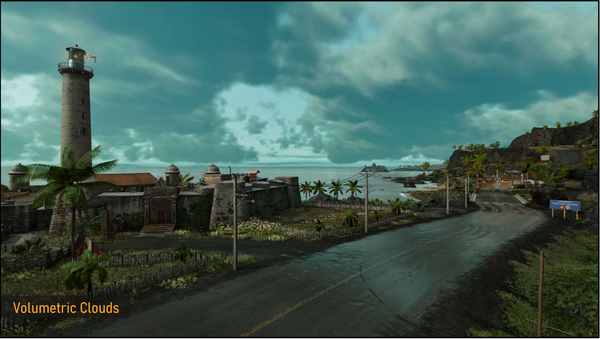
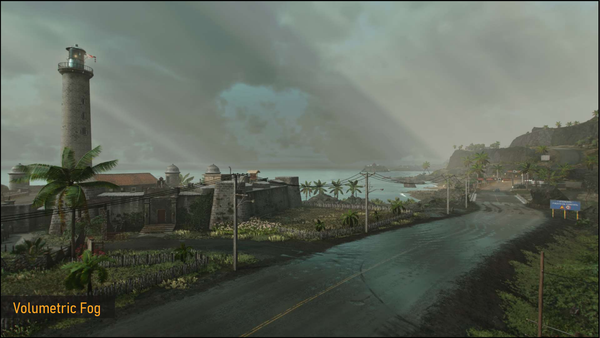
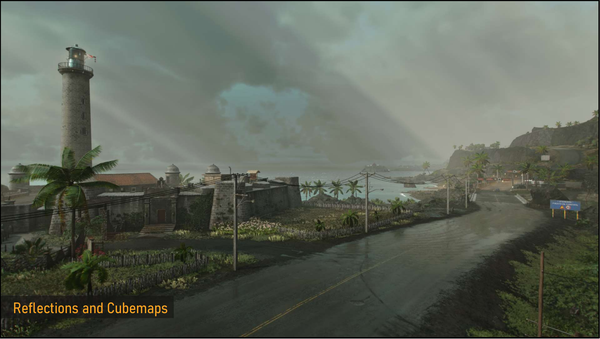
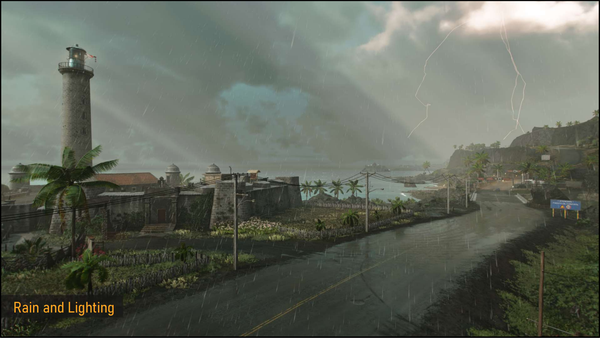
Let’s look at a sample scene to see how these rendering features come together to complete the depiction of our weather states.
接下来让我们看一下这些渲染特性如何组合在一起来形成一个示例的场景的
First, we have the atmospheric scattering 先添加大气散射
Then we have the clouds on the horizon and overhead. 添加体积云(头顶 + 远处)
Then we have volumetric fog obscuring regions and producing light shafts escaping from clouds 添加体积雾
Next we have cubemaps and reflections. Notice the power lines reflected on the road.
And finally we have the rain and lightning which complete the scene of a intense thunderstorm.
3.1 光照模型
Before we look at individual techniques, let’s start with a primer on our lighting model.
We use physically based formulas and aim to be energy conserving as a goal.
New for Far Cry 6, we have a higher quality multiscattering diffuse BRDF, a GGX specular BRDF with a multiscattering lobe, and support for area lights.
The chart on the right shows how we handle specific materials, but one surface type of note was translucency, which is used for vegetation.
For translucency, we wrap diffuse lighting for subsurface scattering and added a second diffuse lobe to simulate light going through the surface.
You can refer to Steve McAuley’s i3D talk from 2019 to learn more about these improvements.
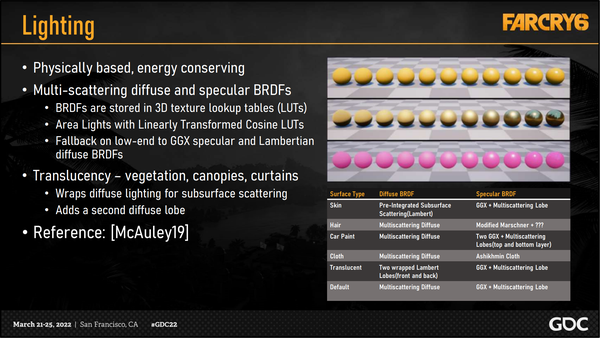
在单独的去看具体的每一个渲染技术之前,先看一下所使用的光照模型。
FC6 团队使用基于物理的公式,并期望达到能量守恒的目标。
在 FC6 中,漫反射部分使用了更高质量的 multiscattering diffuse BRDF(多重散射漫反射 BRDF),specular 部分使用了 GGX specular BRDF(GGX 高光 BRDF) with a multiscattering lobe(多重散射高光波瓣),并且支持区域照明。
右边的图表展示了特定材质的处理方式,但除了表中的内容之外,值得注意的是,植被的表面使用的是半透明效果。
对于半透明效果而言,FC6 图形团队使用了 subsurface scattering(次表面散射),并在其基础上添加了第二层 diffuse lobe(漫反射波瓣)来模拟光束穿过表面的现象。
可以具体查看 2019 年 Steve McAuley’s i3D talk 来了解具体的细节。
3.2 全局光照
For global illumination we use a light probe system where probes are placed by artists throughout the world and baked daily to incorporate changes in the world.
GI data is stored in voxels. We pack 13 frames of data, 11 of which are time of day increments to give coverage to the sky, sun and moon.
There is one keyframe for local lights, which is mostly used at night.
And one key frame for sky occlusion.
But there’s a problem, these GI probes don’t include clouds or any impact from the weather.
The solution we had was to fade out indirect lighting when cloud coverage is high.
This could create a problem if the local lights were in all the keyframes, but since they are isolated to one, we can avoid fading artificial lights during high cloud coverage.
Additionally, urban environments tested the limits of this system. We leaned into the sparse nature of the data and the variable probe size to increase precision near and within indoor environments.
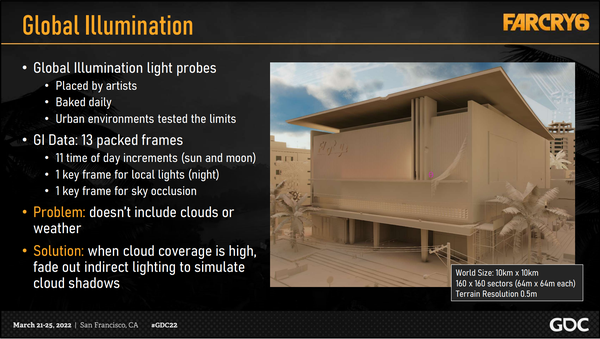
全局光照方面使用了光照探针系统,这些探针由艺术家手动放置。每天的全局光照会通过这些探针烘焙一次,并合并到场景中。
全局光照的数据通过体素的方式存储。全局光照数据打包了 13 帧,其中的十一帧用于覆盖 TOD 的天空、太阳、月亮光照变化。
还有一帧用于局部光照(通常在夜晚使用),剩下的一帧用于天空的环境光遮蔽(sky occlusion)
但这样烘焙的 GI 探针会有一个问题,那就是不会涵盖云的影响和天气的影响。
具体的解决方式就是在云层覆盖度(cloud coverage,在天气系统的系数中定义)较高时,对间接光照使用淡出效果。但这样在局部光照都在关键帧中存在时也会有问题(猜测调整会影响关键帧数据,但这里关键帧指的是这 13 帧中的哪些部分呢?),由于这些局部光照都存在一帧中,就可以在云层覆盖度改变时,避免对局部灯光(这一帧数据)进行修改。
另外,在类似城市的环境使用这个系统的表现并不是很好(到达了表现的极限),对于这个问题,FC6 团队利用数据的稀疏性(城镇的规律建筑导致一些区域内可能没什么东西,或者探针所处环境并没有均匀分布的物体)和探针大小的可变性,提高了靠近室内环境的精确度和在室内环境中的精确度。
3.3 大气照明
We use Brune-ton sky model as well as the Pree-tham sun model, with improvements made such as added ozone
This setup involves LUTs calculated offline, previously this was generated at run-time and that was very slow
Artists create four skies: Humidity 0 and 1, Turbidity 0 and 1 and we blend between these at run-time to get variation
You can check out our GDC talk from 2015 about Lighting in Far Cry 4 to see an earlier implementation if these concepts
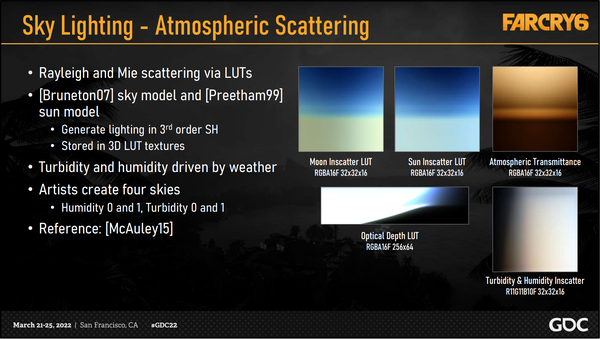
对于天光 - 大气散射部分,FC6 团队使用了 Brune-ton 的 sky model 和 Pree-tham 的 sun model,并在其上添加了臭氧层,用于提升效果。
(附相关资料:GitHub - diharaw/bruneton-sky-model: An OpenGL implementation of Eric Bruneton’s Precomputed Atmospheric Scattering paper.,【译】【大气散射】[Elek09] 实时渲染参数化的、有多次散射的行星大气,UE4 新版大气实时渲染 - 论文导读)
(附相关资料:GitHub - andrewwillmott/sun-sky: Various sun/sky models, convolution of theta/gamma-parameterised models,paper.dvi (duke.edu))
天光的初始化包括 LUTs(Look Up Tables)的离线计算(曾经想用实时生成的方式得到 LUTs,但是太慢了)
可以看到有 Moon Inscatter LUT(月光散射),Sun Inscatter LUT(日光散射),Optical Depth(光学厚度 - 知乎,光学厚度_百度百科) LUT,它们参考了 Brune-ton 的 sky model 和 Pree-tham 的 sun model 的方法,用三阶球谐函数产生光照,并存储在 3D LUT textures 中。
Atmosphere Transmittance LUT 用于模拟 Rayleigh(雷利)和 Mie scatter(米氏散射)(光的散射(瑞利散射、拉曼散射、米氏散射)),
艺术家创造了四种天光的 LUT,一种是潮湿度 0 和潮湿度 1,浑浊度 0 和浑浊度 1 的预设,然后在这四种预设之间进行混合,来得到实时变化的天光。
在 2015 年的 Far Cry 4 GDC talk 中可以找到这些方法的早期实践。gdcvault.com/play/1022235/Rendering-the-World-of-Far,Rendering the World of Far Cry 4 - YouTube
Here we show the effect of the humidity and turbidity parameters on the optical depth LUT and the blended in-scattering LUT. We blend four pairs of data together to get our result.
下面展示了潮湿度和浑浊度参数在光学厚度 LUT 上的效果,以及这两个参数在散射 LUT 混合的效果。FC6 团队混合了 4 对数据来得到最终的效果
The green arrow points to the blended result for each frame and the red arrow points to LUTs with the greatest weight for the frames humidity and turbidity parameters.
绿色箭头指明了每一帧的混合后结果(混合后的光学厚度 LUT 和散射 LUT,上面是 optical depth,下面是 turbidity & humidity inscatter),红色箭头指向的是对这一帧效果有着最大权重的潮湿度和浑浊度参数的 LUT。(可以理解成四个红色的是参数取 0 和 1 的效果,绿色是当前效果,不过这里绿色直接取了 0 和 1 的效果,但是实际场景可能会取中间的值)
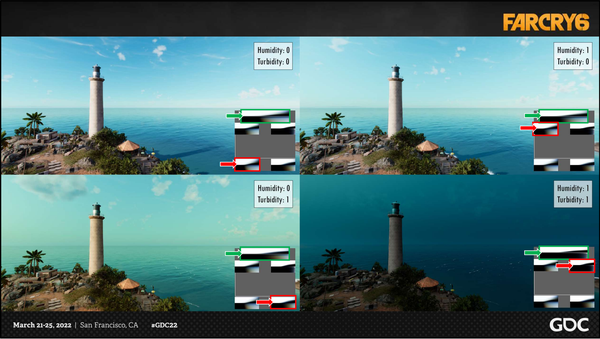
This is what gave us our stunning sunrises and sunsets, which we see casting beautifully on the edges of the clouds.
上面对于天光 - 大气散射的修改带来了震撼的日出日落效果,可以让云有漂亮的边界效果。
That leads us into our next subject, volumetric clouds
那么接下来就可以看看体积云这个话题
3.4 体积云
So why do we want real-time volumetric clouds?
Simply put, a skybox is not sufficient. It has poor results in motion and is difficult to blend between different weather states.
A skybox is also more of a backdrop, whereas we wanted something grounded that interacts with the world.
Additionally, we needed our clouds to respond to weather with varying cloud coverage levels.
Our eventual solution was build upon prior work, as listed here.
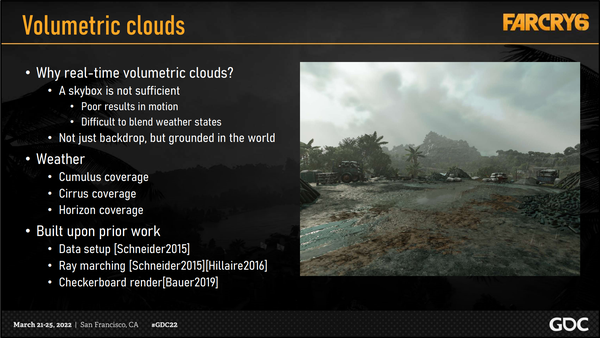
为什么想要体积云?因为简单放一个 skybox 是不够的,他的动态效果非常差,而且很难在两种天气效果下进行混合。
天空盒更像是一个背景,但 FC 团队想要一个更 “实在” 的可以和世界进行交互的东西。同时,也需要云可以响应天气系统中的 “云层覆盖等级” 参数的控制,图中列出了:cumulus coverage(积雨云),cirrus coverage(卷云),horizon coverage(推测是天际线范围的)。
因此规划还是在前有的一些工作上去推出解决方案(上图中的,Data Setup(指的是体积云渲染的各项数据准备),Ray marching,Checkerboard render([siggraph19]《荒野大镖客 2》的大气云雾技术(3/4) - 知乎 (zhihu.com)【Siggraph 2019】Creating the Atmospheric World of Red Dead Redemption 2))
The most important part of cloud lighting is extinction. As light travels through a volume, it loses energy due to the interaction with water particles that clouds are composed of.
This extinction is determined by the Beer-lambert law, which we will henceforth refer to as transmittance.
Extinction consists of both absorption, which is actually quite low for clouds, and scattering.
The light that eventually hits the eye after being scattering is measured in terms of radiance.
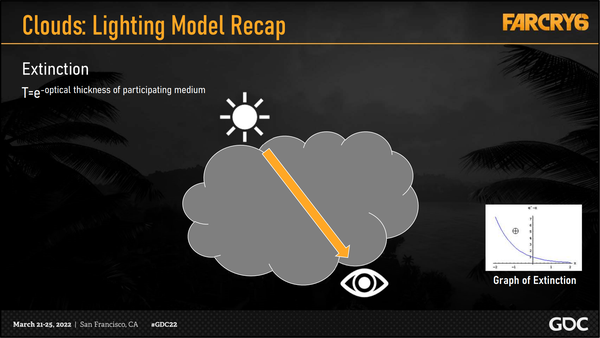
体积云渲染最重要的部分是光线的能量损耗,光线穿过一段体积后,会因为和水分子的交互有能量的损失,而水分子正是云的组成部分
光线能量损耗由 Beer-lambert 公式定义,之后会用透光率 Transmittance 来描述它。
能量损耗包括了吸收(在云里面传播时的能量损耗占比很低)和散射(损耗的主要部分)
穿过云层最终被我们看到的光线由 radiance 定义
Single-scattering refers to when light enters a cloud encounters one scattering event before traveling in the direction towards the observer.
Multi-scattering refers to when light encounters a near limitless number of scattering events within the cloud before traveling in the direction towards the observer.
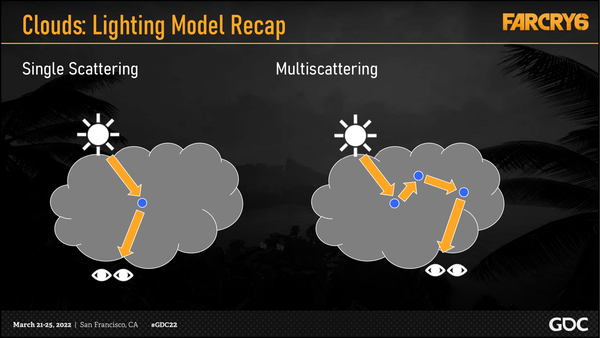
单散射指的是光线进入云后,遭遇了一次散射事件然后传播向观察者眼睛的方向。(反射一次直接到人眼)
多重散射指的是光在进入云后,无限制的在云内产生散射事件后,再传播向观察者的方向。(因为水分子反射多次后再进入人眼)
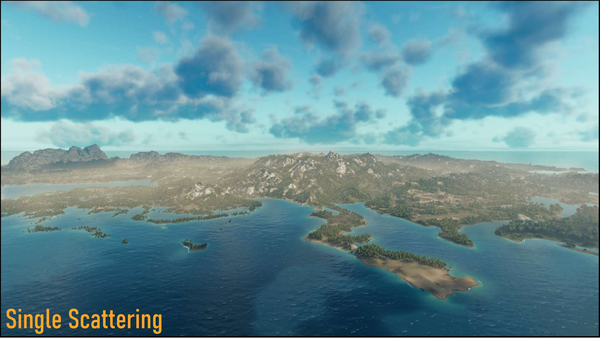
Here we show the effects of the single scattering on the clouds 单独单散射的效果:下图 1
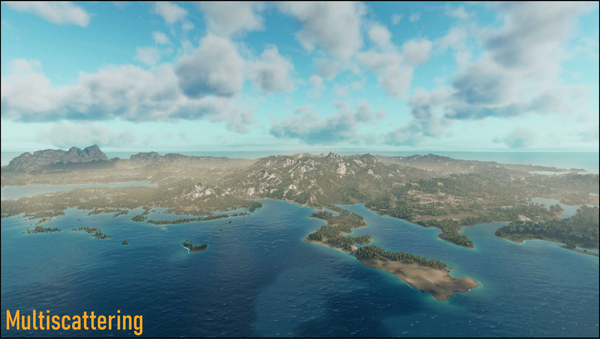
Next we isolate the effects of multiscattering on the clouds. 单独多散射的效果:下图 2
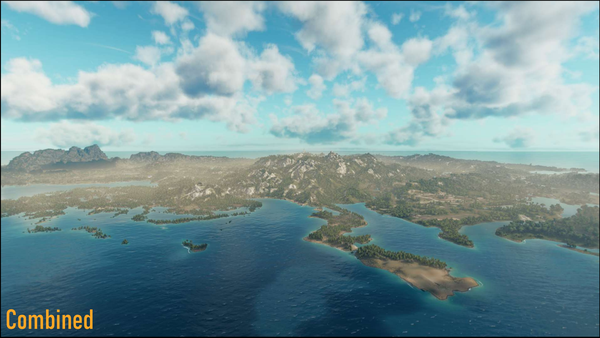
And finally we have the effect of both. Notice the greater sense of depth in the clouds. 将两种散射结合在一起的效果,云的深度更加明显
All of these scattering events can be modeled by a phase function which projects how much light and in what direction it will travel after it is scattered.
In this diagram we have the oval shape representing the phase function approximation of light scattering after the scattering event at the blue dot.
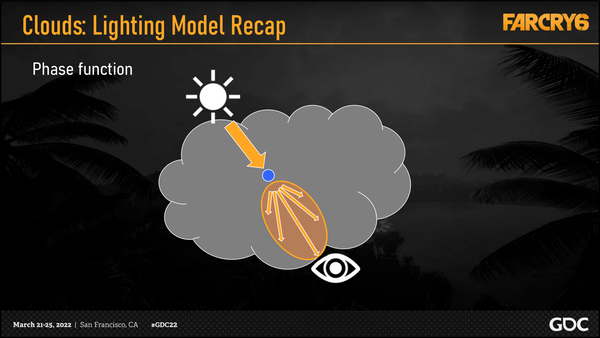
这两种散射可以由相位函数统一建模(指的是数学上建模,类似于 brdf 建模了反射的比例和光通量),相位函数定义了在某一特定方向下,光线传播并散射后还会有多少光(的能量)(也可以理解为:光线在所有散射的方向中,某个方向所占的比例)
在图中粗略的展示了光线在蓝色点处发生的散射现象,光线散射的相位函数在这里用一个粗略的椭圆(3d 中是椭球)形状来进行演示。
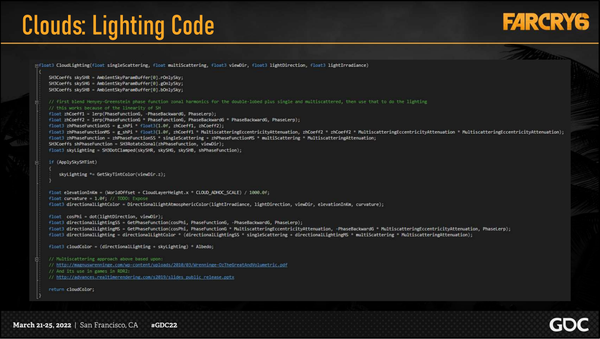
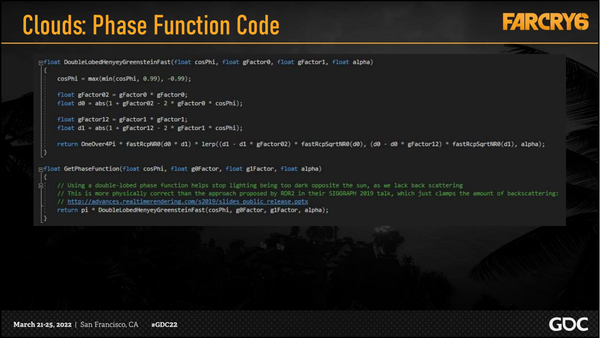
On the right is a plot of the Double-lobed Henyey-Greenstein Phase Function we used in our implementation.
The real phase function for clouds would be much more complex and far too expensive to calculate in real-time.
You can also reference this and other lighting code in the bonus slides.
Graph of Fog Phase Function https://www.desmos.com/calculator/dcgvobzm4n

图中的右侧是一个 FC 团队实际应用的 Double-lobed Henyey-Greenstein 相位函数,其具体的代码详见附录(即对 ppt 中公式的代码实现)
现实中的云层相位函数会非常复杂并且在实时计算中非常消耗性能。
使用的雾的相位函数可以参考:https://www.desmos.com/calculator/dcgvobzm4n
Let’s talk about how we authored cloud data, which represents the density of particles in the clouds to be used for our scattering techniques.
We created base and detail textures, containing mixes of noise types and frequencies, which were collapsed into a single channel.
These textures are then volumetrically sampled and blended together to create clouds shapes.
Next we generated a weather map to be tiled in the world and scrolled in the wind direction from our weather manager.
This builds our XY cloud formations and enables us to smoothly interpolate between levels of clouds coverage.
We also have a curl noise, which contains 3d vector data which we use as an origin-offset when shooting rays into the base and detail noise.
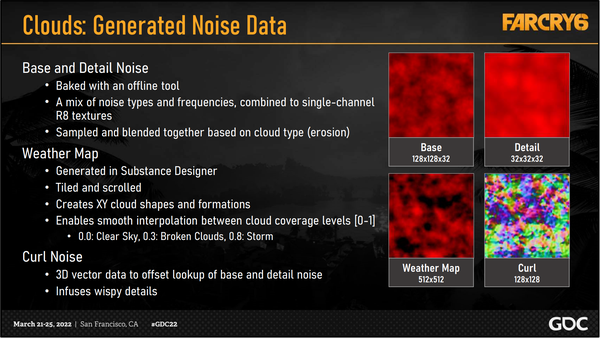
接下来的内容是关于如何构建与存储云的数据,这个数据描述了云层内部的水分子密度,可以用于散射计算。
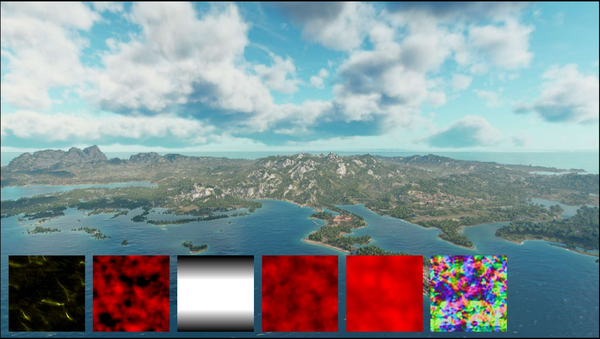
FC 团队创造了基础和细节纹理,纹理中包含了对噪声形式和频率的混合,被存储在一个通道(R8)中。包括两张 3D 噪声纹理,Base Noise Texture 和 Detail Noise Texture,Base 和 Detail 两种纹理都是离线工具生成的,组合了多种不同频率的噪声。
这些纹理将会被体积化采样并混合在一起用于创建云的外形。(怎么做到的,)
另外还在 Subtance Designer 中创建了一张 weather map,Weather Map 会被直接平铺到世界空间上,还会受 weather manager 控制随着风向滚动。用这张图可以构建出 XY 方向上云的形状,让云能够在不同的覆盖等级间自然的过渡,同时 Weather Map 中保存的值还代表了云的密度。
还有一张 Curl 噪声贴图,里面保存了三维的偏移数据,对 Base 和 Detail 纹理采样的时候会拿这张图进行偏移,让云看起来细节更丰富。
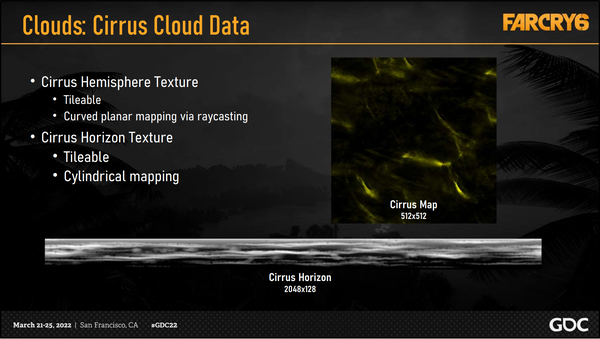
Finally we have the cirrus cloud texture which we map hemispherically to the sky and cirrus horizon texture which we map in a cylinder around the camera.
最后还有卷积云纹理通过半球映射到天空上,同时卷云地平线纹理会以按照圆柱体映射在相机附近
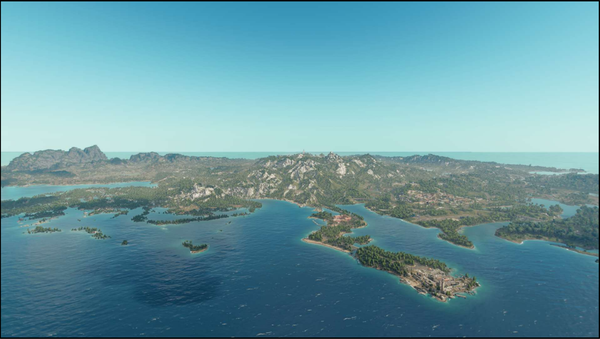
Let’s put these all together. Here we start with a clear sky and just our atmospheric scattering,接下来是将上面提到的效果综合应用的一个展示,第一张图是纯净的天空加上大气散射
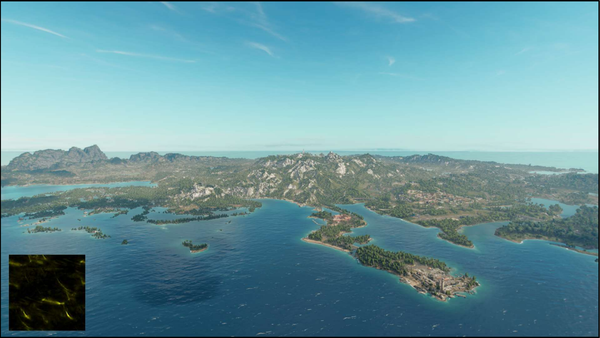
Then we add the cirrus hemisphere and horizon clouds. 第二张图在第一张的基础上添加了半球卷云和地平线云
Then we add the weather map and you start to see the xy shape of the cloud formations 第三张图增加了天气映射,可以看到云在 x 轴向和 y 轴向的形状
Then we combine in the gradient texture to define the shape of the cloud. This cumulus gradient ended up being the only gradient we needed to ship, although we did experiment with others. 第四张图增加了梯度贴图来定义云的形状,这种积云渐变是我们唯一需要使用的渐变,不过我们也尝试了其他渐变。(有一种说法是限制高度)
Then we use the base detail noise volume texture to get the distinctive cumulus cloud shapes. 第五张图使用了 base noise 体积纹理来得到独特的积云形状
Then we use the detail noise volume texture to erode more detail. 第六张图使用 detail noise 来雕刻更多的细节
Then we add in the curl noise texture to get wispy details. 最后一张图使用噪声纹理来得到束状细节
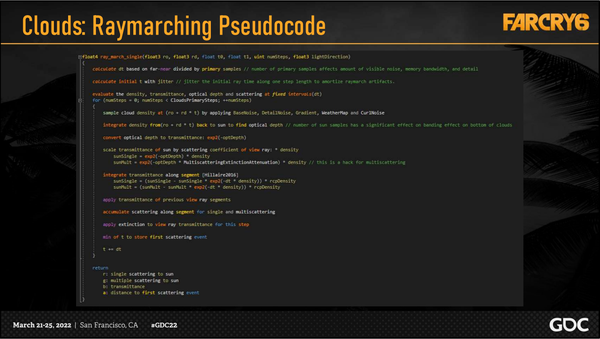
Raymarching is the process we used to draw clouds efficiently, it involves shooting a ray from the observer and evaluating at specified steps.
At each step we integrate the density from that point back to the sun(or moon).
We then convert the optical depth that is returned to transmittance which can then be used to approximate single and multiscattering.
We then integrate this transmittance along the segment and accumulate the single and multiscattering for the ray-march total.
We also apply the extinction to the transmittance so that affects later ray steps.
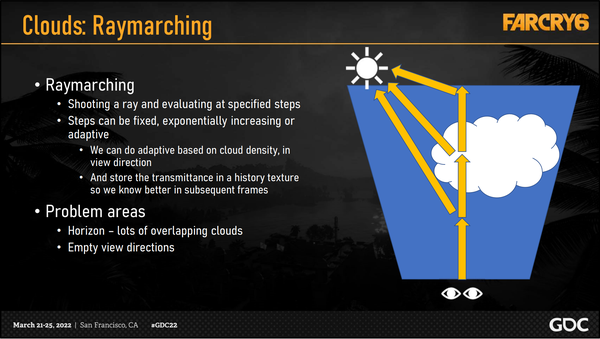
光线步进是高效绘制云的过程,这个过程包括从观察者处射一束光,并计算他的具体步进。
每一步都对光线在当前位置到太阳或者月亮的密度(理解为一步一个到光源的密度?)进行累加。
然后将返回的光学深度(optical depth)转换为透射率,再利用透射率来近似计算单散射和多散射。
然后,我们对沿线段的透射率进行累加,并将单散射和多散射累积起来,得出光线步进总和。
我们还会对透射率进行消光处理,以影响后面的光线行进的每一步。
Raymarching 本身很慢,常用的优化手法是改变步进的策略和结果的分帧累加。
The general process for each pixel is therefore as follows:
Calculate the origin from the pixel and ray-march the density, transmittance, optical depth and scattering(single and multiscattering)
Calculate the cirrus clouds if there is a non-zero transmittance
Use the single and multiscattering values to calculate the radiance with the phase function
And then calculate atmospheric scattering and blend the clouds in front using inverse transmittance as a mask.
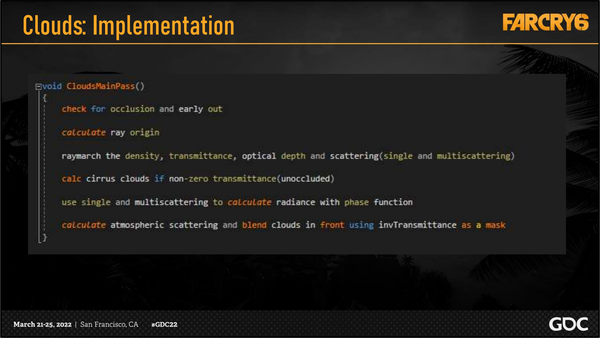
每一个像素的运算过程如下:
从像素计算原点,并用 ray march 测量密度、透射率、光学深度和散射(单散射和多散射)
如果步进得到的透射率不为零,则计算卷云
使用单散射和多散射值与相位函数一起计算辐射度
然后计算大气散射,并使用反透射率作为 mask 来将云层混合在场景的前面。
It would be far too expensive to ray march at the full screen resolution so we do so at half of the screen resolution.
We have a radiance and a transmittance texture, as well as history radiance and transmittance textures, which we temporally reproject from the last frame.
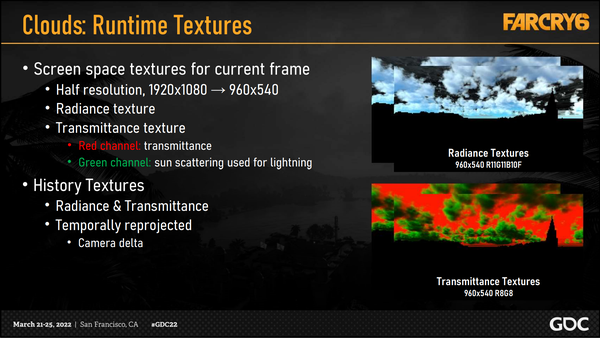
在全屏分辨率下进行光线步进的成本太高,因此以屏幕分辨率的一半进行光线步进。
在半分辨率的情况下就有两套纹理,对于每一次计算而言有一个 radiance texture 和一个 transmittance textures,以及上一帧的历史 radiance texture 和 transmittance textures,每次计算后会将这一次的结果映射到上一帧上。
We fill these runtime textures using a checkerboard rendering process.
We do a single ray-march for each pixel quad, using a checkboard offset combined with curl noise offset to get the ray origin.
The ray-march result is single scattering, multi-scattering and transmittance.
We reproject the history into the current frame, gather the neighborhood and reject based the heuristics listed.
We then use bilinear interpolation of the neighbors, and spread the result of the ray-march over this area, fading the history over time.
The result is stored as radiance and transmittance history that will be used for the next frame.
Particularly of note is the process we use to store the radiance. We encode this with blue noise to help mask the noisy artifacts inherent to raymarching at such a lower resolution.
Notice on the right, when we do a 2x blur of the blue noise it converges to grey, while the white noise does not.
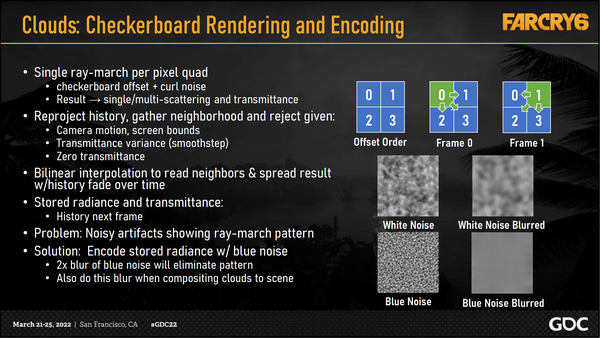
FC6 团队使用棋盘格渲染流程来填充这些运行时纹理,但在大表哥 2 的基础上还做了一些优化。
使用棋盘偏移和卷曲噪声偏移来获取射线原点,对每个 pixel quad 进行单次光线步进(每帧每四个像素只做一次 Ray Marching)。
一个 pixel quad 的光线步进结果包括单散射、多散射和透射。
将历史帧的信息重新投影到当前帧,收集邻域信息并根据所列启发式方法进行剔除,剔除给定的:相机运动、屏幕边界、透射率 smoothstep,零透射率。
然后,使用双线性插值法对邻域进行插值,并将光线步进的结果传播到这一区域,随着时间的推移对历史效果进行淡出。
以上结果以 radiance 和 transmittance 历史记录的形式存储,将用于下一帧。
特别值得注意的是存储 radiance 的过程。FC 团队用蓝色噪声对 radiance 进行编码,以帮助掩盖在低分辨率下进行光线步进时固有的噪声 artifact。
请注意右图,当我们对蓝色噪点进行 2 倍模糊处理时,它将收敛为灰色,而白色噪点则不会。
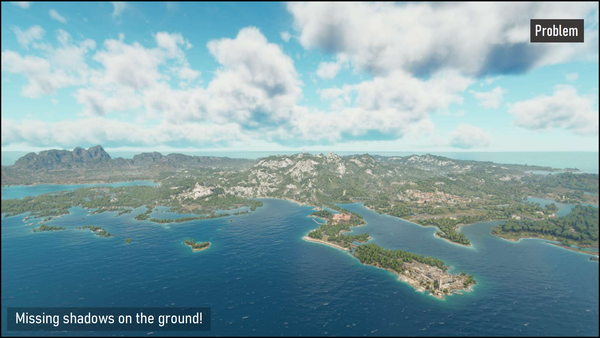
This looks pretty good, but there is a problem! We are missing shadows on the ground. 看起来很不错,但是没有阴影
This makes it hard to determine where the clouds actually are. In reality they are right over the island. 要决定云具体在那里是比较困难的,在现实中,它们在岛的正上方
(note there are other bigger issues like a fully lit environment when the sky is overcast)(注意到还有其他更大的问题,例如当天空阴沉时,需要一个光线充足的环境)
We tried ray-marched shadows from the gbuffer but that was too costly.
The solution we landed upon was projected cloud shadows.
It was a simple orthographic projection – nothing fancy.
The resulting shadow texture will be used later on for volumetric fog to get light shafts from clouds.
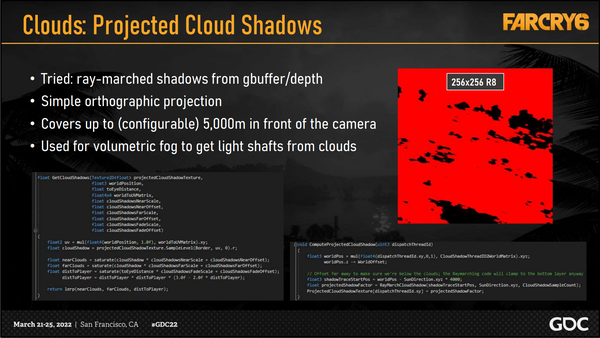
团队尝试了从 gbuffer ray march shadow,但是太耗了。
最终云层阴影的落地方式是投射云层阴影,见右侧代码,从地面很低的位置向上采样。
即:正交投影,覆盖相机前 5000m 的区域
得到的阴影贴图会在后续的体积雾阶段使用,来获得一些光柱的效果。见左侧代码,会从右侧代码计算的 ProjectedCloudShadowTexture 中获取 cloudshadow
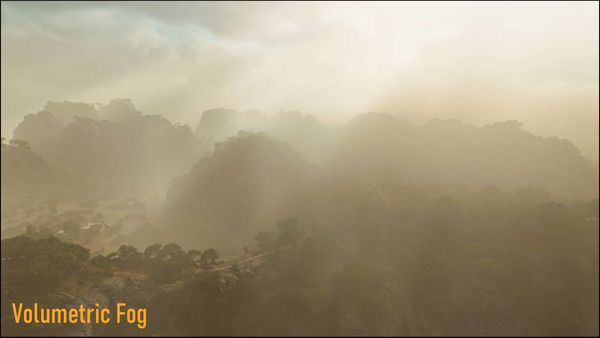
And here we have the clouds on the ground and on the water. 这样就有云的阴影了

3.5 体积雾
Next we have the volumetric fog which is used for environmental height fog as well as local fog from weather presets.
接下来是体积雾,用于环境高度雾和天气预设的局部雾。
Our implementation uses a frustum aligned voxel grid presented in prior work
We have local and global fog based on weather, as well as local fog used for different biomes.
With the volumetric fog, light shafts are created by shadows evaluated within the cells of the volume.
Herein lies some problems!

FC6 的实现采用了先前工作中(【Siggraph 2014】Volumetric Fog: Unified compute shader based solution to atmospheric scattering,【译】【寒霜引擎】【大气渲染】基于物理的天空、大气和云的渲染(下))提出的 frustum 对齐体素网格。
游戏中使用的雾有基于天气的局部雾和全局雾,以及用于不同生物群落的局部雾。
对于体积雾,光束是由单位体积(cell)内的阴影估算产生的。
体积雾的实现方法是经典的 Froxel Volume,按照体素划分视椎体,然后在这个区域内计算每个像素的光照结果并沿着视角方向进行离散化积分。体素视椎体的分辨率是 120x68x120,对应一张 Irradiance Volume 纹理和一张 Attenuation Volume 纹理。
但这里存在一些问题!
Here’s a brief overview of the volumetric fog process.
We prepare our scene depth information in the first 3 steps shown, and cull local fog volumes to screen tiles.
We will cover the remaining steps in the following slides.
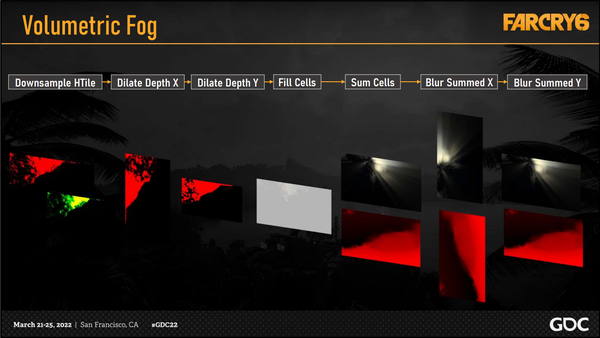
以上是体积雾化过程的简要概述。
在所示的前 3 个步骤中准备好场景深度信息,并将局部雾体积剪切为屏幕 tiles。
整个体积雾渲染的流程。首先进行降采样,然后对深度进行 XY 方向上的膨胀(Dilate)。之后为 Froxel Volume 填充数据,最后沿着视角方向进行积分,再沿着 XY 方向进行 Blur 得到最终的结果。
将在下面的幻灯片中介绍其余步骤。包括填充 cell,叠加 cell 的方式,以及不同世代主机的 blur 方式
We fill the cells with irradiance. We do this using the local and global densities of fog and fog particles
as well as lighting from the sun, atmosphere, indirect lighting and point and spot lights.
Note that we use a temporal filtering on last gen instead of the upcoming bilateral blur.
For this we require a history buffer that is reprojected into the current frame and faded out over time.
This requires more memory and unfortunately has some ghosting artifacts, but it is a cheaper solution.
We used the same phase function as with the volumetric clouds.
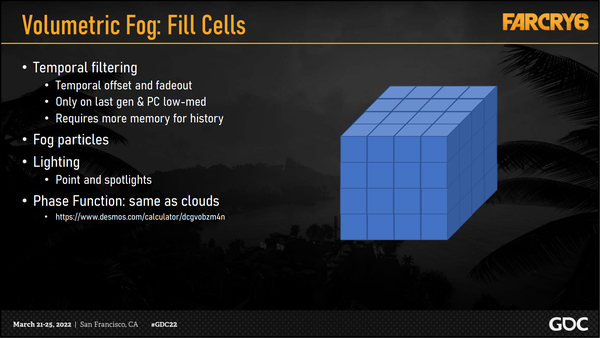
Irradiance Volume 纹理在计算的时候会接受各种光照信息,会利用到雾和雾粒子的局部和全局密度,还会利用包括来自太阳、大气、间接照明、点光源和聚光灯的光照来进行 irradiance 的计算,这些 irradiance 会填充在单元格内。
需要注意的是,FC 团队在上世代的机器上使用了时间滤波方法,而不是次世代的双侧模糊方法。
为此需要一个历史缓冲区,将其重新投射到当前帧中,并随着时间的推移逐渐淡出。
这需要更多的内存,而且不幸的是会产生一些鬼影 artifact,但这是一种成本更低的解决方案。
在计算体积雾时使用了与体积云相同的相位函数。
After we fill the cells with irradiance, we calculate a continuous sum towards the back of the volume
Now we can sample any voxel for full irradiance accumulation, from the eye to destination.
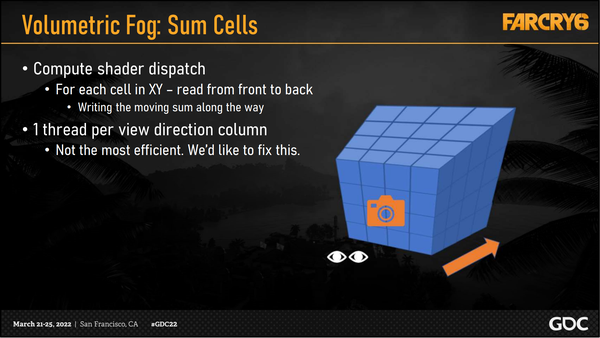
完成 Fill Cell 之后需要按照从前到后的方向累加 Irradiance,这一步用 Compute Shader 算,每一个 Thread 对应 XY 平面上的一个像素,完成累加后再按屏幕空间采样最后一个 XY 平面就是最终的 Irradiance。
And finally, on next gen, we do a two stage process of a bilateral blur in the x and y axis.
Blurring in the X axis outputs a transposed result, and blurring in the Y axis transposes back to the original orientation. This optimizes the reads and writes of the textures.

在次世代的机器上,对于模糊阶段,在 X 轴和 Y 轴上进行了两阶段的双边模糊处理。
在 X 轴上进行模糊会输出转置结果,而在 Y 轴上进行模糊则会转置回原始方向。这样可以优化纹理的读写。
But there’s a problem!
On the right you can see stair-stepping in the light shafts, which is an artifact of sampling!
We want this to be smooth. The bilateral filtering HELPS but doesn’t solve this completely.
The next approach we tried was to blur the actual shadow maps.
One benefit of this approach is that the result can be used in multiple places.

但是这也有一个问题。
在右图中,可以看到光柱的阶梯状变化 artifact,这是采样造成的。
肯定希望光柱是平滑的。双边滤波有助于解决这个问题,但并不能完全解决。
为了解决这个问题,FC 团队对 Shadow Maps 做了降采样和模糊。
这种方法的一个好处是可以在多个地方使用。
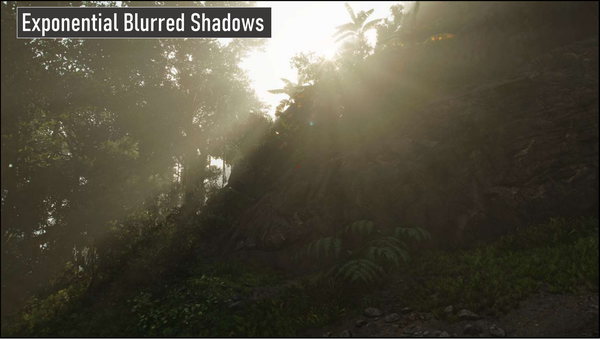
Here we see the process for exponential blurred shadows
First, we convert and downsample our three near shadow slices or cascades of our shadow map for the sun.
Then, we blur the slices and downsample again.
As you can see, the result is significantly smaller than the original which is more optimal for quality and performance when volumetrically sampling.
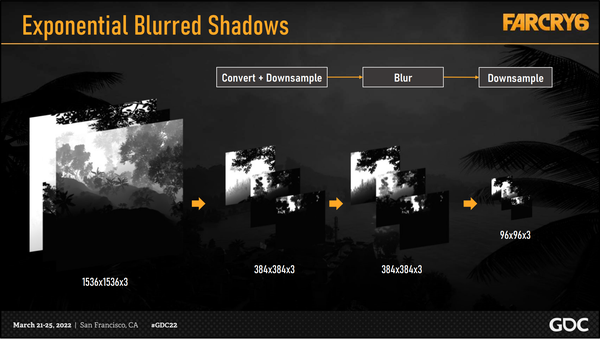
对 Cascade Shadow Maps 先做一次 1/4 降采样,然后做一次 Blur,接着再做一次降采样,然后变成之前的 1/16,这时候计算体积效果的时候再采样这张 Shadow Maps 会非常快,同时还不会出现之前的 Artifacts。
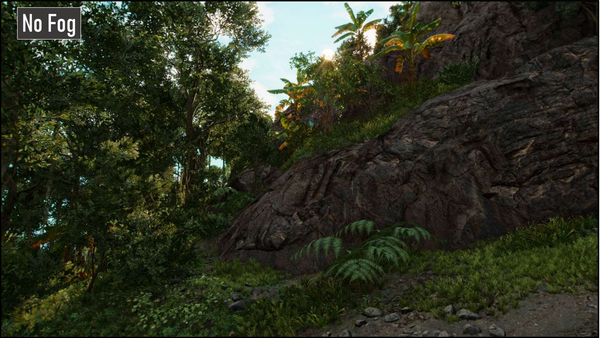
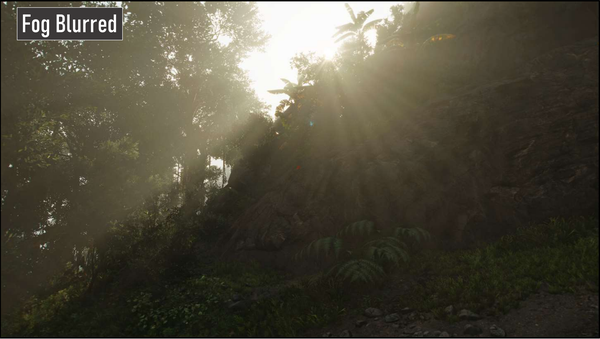
Let’s look at a sample scene with no fog from our weather manager. 图一是没有雾的效果
Here we see the fog on its own with less than ideal artifacting. 图二是雾的单独效果
This is the result of blurring the irradiance volume in screen space. It’s better but there are still artifacts that suggest the shape of the voxels. 图三进行了模糊,但是仍有一些 artifact
And finally, we enable the exponential blurred shadows. 图四模糊了 shadow map 之后,基本消除了这个 artifact

To this point we have not mentioned how we apply the clouds
We apply atmospherics, clouds and fog at the same time to save on bandwidth writing to areas of the screen where both are visible.
You can also see here that the clouds shadows give nice light shafts in the fog.
One final detail in our composite pass is that we apply the final value with more blue noise at the final screen resolution.
This, when combined with the temporal AA post process, further eliminates raymarching artifacts visible in the clouds.
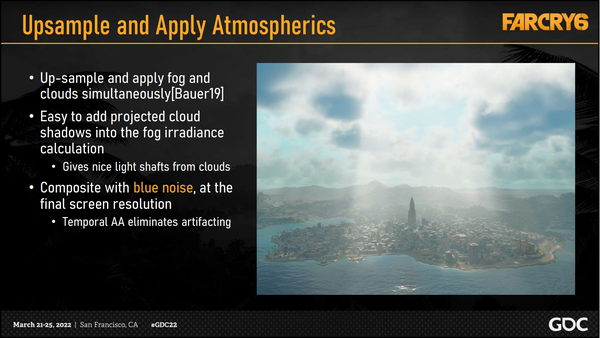
到此为止,FC 团队还没有提到如何应用云。
同时应用大气效果、云和雾,以节省在写入时屏幕上云雾效果同时可见的区域的带宽。
还可以看到,云的阴影在雾中形成了漂亮的光轴。
在组合的 pass 的最后一个细节是,在最终屏幕分辨率下应用了带有更多蓝色噪点的最终值。
这与 TAA 后期处理相结合,进一步消除了云层中可见的光线轨迹伪影。
3.6 反射
Next lets talk about reflections.
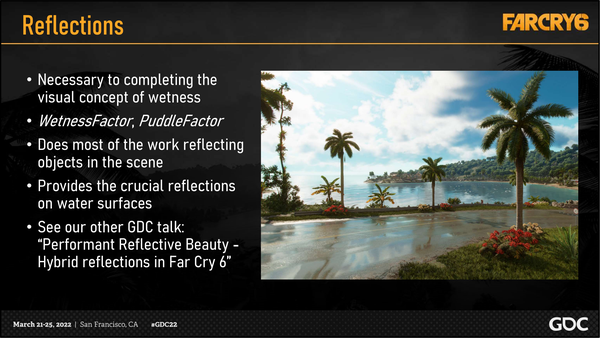
Reflections are crucial to completing the visual concept of wetness.
As Emily mentioned before, we use values from the weather system to determine what surfaces are wet.
Then we perform a process where rays are path traced using gbuffer positions and normals to pixels in screen-space to be reflected.
This does most of the work in reflecting objects in the scene, such as the trees, sky, and clouds on the surface of the road as well as the mountains shown on the water surface.
For more information about our SSLR as well as our hybrid raytracing solution, see my colleagues Stephanie and Ihor’s talk: Performant Reflective Beauty.
接下来谈谈反射。
反射对于完成湿润的视觉概念至关重要。FC 团队使用天气系统中的数值来确定哪些表面是湿的。
然后,使用 gbuffer 位置和法线对屏幕空间中需要反射的像素进行光线路径追踪。
这就完成了场景中大部分物体的反射,例如路面上的树木、天空和云朵,以及水面上的山脉。
有关 SSLR 以及混合光线跟踪解决方案的更多信息,请参阅 Stephanie 和 Ihor 的演讲: Performant Reflective Beauty.
即 FarCry6 的反射用的是混合方案,有屏幕空间的反射 SSLR 也有硬件光追反射。
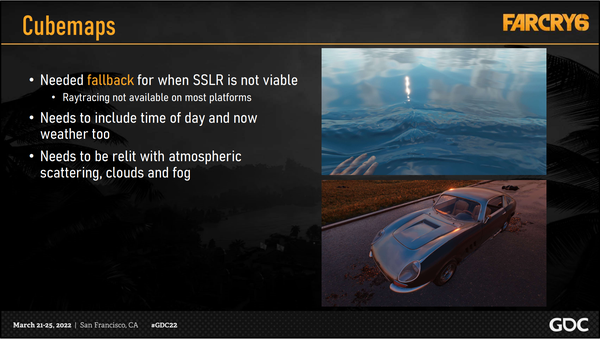
But what happens when we don’t have data for screen space reflections, such as when we view water at the angle shown in the image on the right?
We need a fallback when there is no data to drive screen-space reflections.
Our fallback comes in the form of cubemaps, which need to show time of day changes, weather, and clouds, as shown by the sunset reflections on this car.
Our Cubemaps are generated at build time in positions determined by artists. They are then relit with our atmospheric scattering, clouds and fog.
屏幕空间反射有个问题,就是在某些视角下,压根就没有能反射的颜色信息(比如以右图所示的角度观察水时,不在屏幕里的东西无法被反射),因此当没有数据来驱动屏幕空间反射时,需要一个备用方案。
这时候就要 Fallback 到使用 Cubemap,它需要显示一天中的时间变化、天气和云层,如这辆车上的日落倒影所示。
这些用于 Fallback 的 Cubemap 是美术挑了一些固定场景进行 Bake,然后在运行时加载并进行 Relighting,在 Bake 下来的 Cubemap 上再添加天空云雾,最终再用于反射。
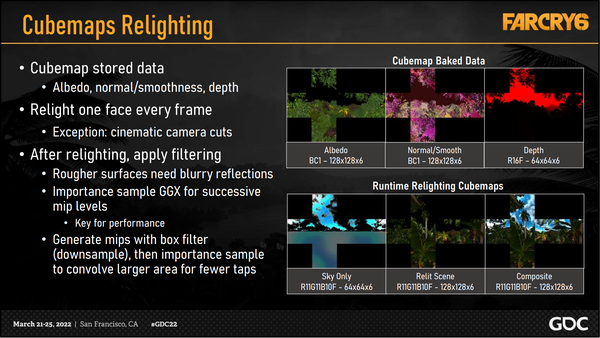
Cubemap data is baked and stored as albedo, normal and smoothness, as well as a lower resolution depth.
To achieve acceptable performance, we relight just one face of the cubemap each frame, except in special cases such as cinematic camera cuts.
The process starts with generating a sky only cubemap containing only atmospheric scattering, clouds and fog. The sky-only cubemap used for fallback reflection on our ocean.
We then relight the scene face using the baked cubemap data.
Finally, we composite the sky cubemap into the relit scene cubemap, giving the result shown bottom right.
We progressively update a single face each frame, attempting to process cubemaps when streaming in new areas.
After the relighting process, cubemaps need to be filtered for blurrier reflections on rougher surfaces.
Cubemap 数据以 albedo、normal 和 smoothness 以及较低分辨率深度(lower resolution depth.)的形式烘焙和存储。
为了达到可接受的性能,我们每帧只重新照亮 cubemap 的一个面,过场动画等特殊情况除外。
每当 Streaming 地图新区块的时候,就会运行时做 Relighting,Relighting 的时候会先渲染一张 Sky Only 的 Cubemap,里面只包含天光、云雾,这张图会直接用作海面反射的 Fallback。
然后会使用 Bake 下来的这几张纹理 Relit Scene,最后再把 Sky Only 和 Relit Scene 拼在一起得到最终的 Cubemap 作为场景整体的反射 Fallback。
在每一帧中逐步更新单个面,并尝试在新区域流送时处理立方体贴图。
在重新照明过程之后,需要对立方体贴图进行过滤,以消除粗糙表面上的模糊反射。
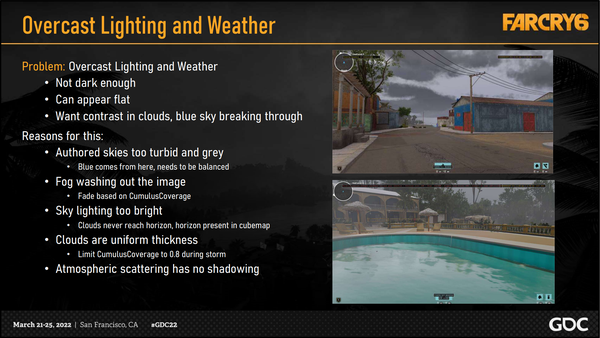
One large problem we had was overcast lighting and weather.
Sometimes it just wasn’t dark enough. It could also appear flat.
We want the clouds to have contrast and sometimes have blue sky breaking through
There were several reasons why this was happening. One such example was our authored skies being too turbid and grey. If you want blue at all in your natural lighting, it comes from here.
But be careful, otherwise atmospheric scattering on clouds too blue
We also had issues with the fog washing out the image. To fix this we fade fog based on cloud coverage.
We had Sky lighting that was too bright because clouds never reach horizon and the cubemap has a band of blue at the horizon that contributes to the brightness.
Clouds of uniform thickness could also wash out the image, which is why we limit CumulusCoverage to 0.8 even during a storm.
And finally, our Atmospheric scattering has no shadowing which inherently causes problems as well.
FC 团队遇到的一个大问题是阴天的光线和天气。
有时光线不够暗。也可能让场景显得很平。
团队希望云层有对比度,有时还能透过云层看到蓝天。
出现这种情况有几个原因。其中一个原因就是他们自制的天空过于浑浊和灰暗。如果希望在自然光照中有蓝色,应该从这里开始修改。
但修改一定要小心,否则大气散射会使云层变得太蓝。
团队还遇到过雾冲淡图像的问题。为了解决这个问题,他们根据云层覆盖率来淡化雾。
FC6 的天空照明过于明亮,这是因为云层没法达到地平线,而立方体地图在地平线处有一条蓝色带,增加了亮度。
云层密度太均匀了,看起来就很扁平,因此他们将积云覆盖率限制为 0.8,即使在暴风雨期间也是如此。
最后,他们的大气散射没有阴影,这本身也会造成问题。
3.7 GPU 粒子
Now let’s move our attention to rain. Remember, the weather manager keeps track of a rain factor that we will use to drive our particle system.
It was very apparent early on that our existing CPU particle system would not be able to produce the number of particles we wanted for rain.
Therefore, we set out to create a GPU particle system to render rain effects, and in doing so ended up with a generalized system that supported many other particle effects as well.
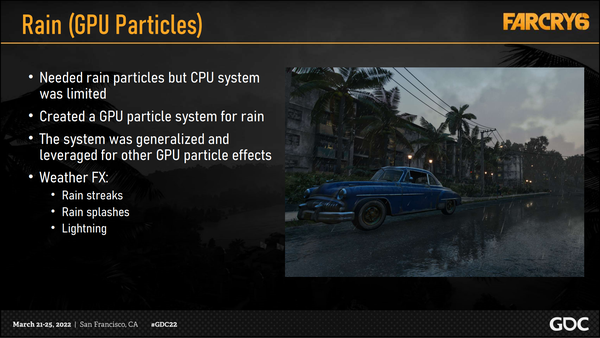
接下来介绍下雨的效果。weather manager 会控制 rain factor,这个会用来驱动粒子系统。
很显然,现有的 CPU 粒子系统无法生成想要的雨粒子数量(意思就是很多)。
因此,FC 团队开始创建一个 GPU 粒子系统来渲染降雨效果,并最终创建了一个通用的系统来支持许多其他粒子效果。
Here’s a brief overview of our particle system you can refer to later.
In summary, we use compute shaders to emit, simulate, sort and render all the particles all on the GPU with minimal interaction with the CPU.
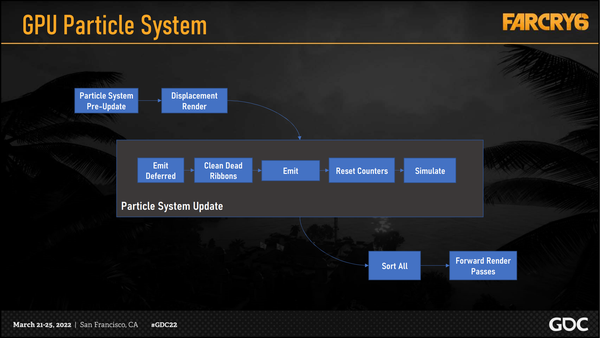
这里是 GPU 粒子的简要结构图
总的来说,FC 团队使用 compute shader 来发射粒子、模拟粒子运动、排序粒子、整理并渲染所有的粒子,这些过程都是在 GPU 完成的,并且和 CPU 仅有较少的交互。
For any particle system you need the billboards or geometry rendered in the right order.
Our solution was to use a bitonic sort to order all the particles at once.
This algorithm is massively parallel, and while it has a higher average cost than something like a radix sort, it has one of the lowest worst case costs, which is important in game development to avoid frame time spikes.
Once we have a set of visible particles sorted and ready to render, we need to filter which particles need to be rendered in which pass.
We used the prefix sum algorithm to effectively eliminate empty space in the sorted list of visible particles after isolating for a given render pass.
This is another highly parallelized algorithm, perfect for the GPU
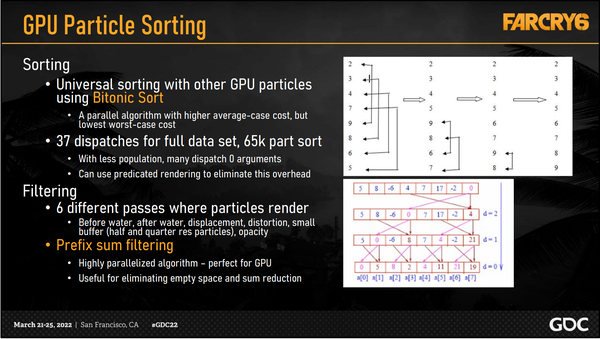
对于任何粒子系统,都需要以正确的顺序渲染 billboards 或 geometry。
FC 团队的解决方案是使用 bitonic sort 一次性对所有粒子进行排序。
这种算法是大规模并行的,虽然它的平均消耗比 radix sort(基数排序)高,但却是最坏情况下成本最低的算法之一,这在游戏开发中对于避免 frame time spikes(某一帧需要的时间暴涨)非常重要。(就是每一轮排序每个线程调换对应的两个数据,所有数据排序下来用了 37 个 Dispatch)
对一组可见粒子进行排序并准备好渲染后,需要过滤,使特定的粒子在特定的 pass 渲染(有这些 pass,Before water, after water, displacement, distortion, small buffer(一半或四分之一 res 的 particle), opacity)。
在单独隔离出某一个特定的 pass 后,使用了前缀和算法进行过滤,前缀和算法可以消除可见粒子排序列表中的空位。
这是另一种高度并行化的算法,非常适合 GPU
Let’s go through some of our particle effects. The first particle effect we will look at is the rain streaks.
We experimented with refraction, blur and reflections, but we ultimately used transparent textures to achieve the look of rain in photography, which was our art direction.
We used two frames of variation and a normal texture to aid in the lighting.
We recycle the rain streaks in a cylinder around the player to ensure the number of rain particles remains consistent, regardless of how fast the camera moves.
To add continuous variation in the particles throughout their lifetimes, we used a 3D noise texture mapped to world space as turbulence.
And finally, the emission rate and direction of the rain is determined by rain and wind values provided by the weather manager.
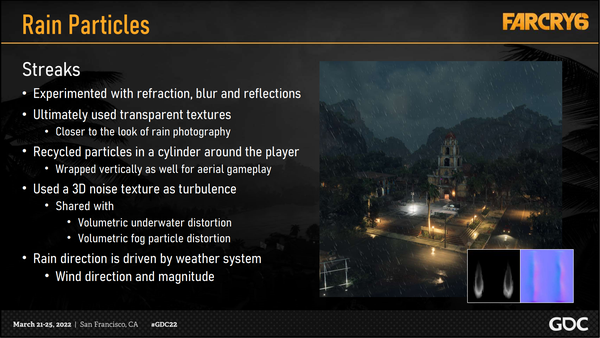
接下来看一些粒子效果。第一种粒子效果是雨条纹。
FC 团队尝试了折射、模糊和反射等效果,但最终还是使用了透明纹理来实现摄影中的雨景效果,这也是 FC 团队艺术上的目标。
使用了两帧不同的基础色纹理和法线纹理来辅助最后的 lighting 效果。
在玩家周围的圆柱体中循环使用雨点条纹,以确保无论摄像机移动多快,雨点粒子的数量都保持一致。
为了在粒子的整个生命周期中增加一些持续的变化,我们使用了映射到世界空间的 3D noise texture 作为扰动。
最后,雨的发射率和方向由 weather manager 提供的雨量和风力值决定。
Since we had many indoor and outdoor environments, we needed to occlude rain where it was not plausible.
To do this, we created a rain shadow map that we can reference to determine if a rain streak or splash was occluded.
This was a directional shadow set up to cover the playable area near the camera, parallel to the rain direction
We then stored this in our regular sun shadow atlas, shown on the right. The colored image left of it is the look up table that is used to convert UV space into the atlas texture.
This rain shadow map only contains static scene elements and is updated a few sections each frame.

由于游戏中有许多室内和室外环境,因此需要在不可能下雨的地方遮挡雨水。
为此创建了一个 rain shadow map,可以参考该 shadow map 来确定雨点或水花是否被遮挡。
这是一个定向阴影设置,用于覆盖摄像机附近的可玩区域,与雨水方向平行。
然后,我们将其存储到常规的 sun shadow atlas 中,如右图所示。左侧的彩色图像是查找表,用于将 UV 空间转换为图集纹理。
这个 rain shadow map 只包含静态场景元素,每帧更新几个部分。
The next particle effect we had was the splashes that appear when rain hits a surface.
Initially this was just driven by a GPU particle event system, which emits new particles when a parent particle hits a surface on the depth buffer, terrain or water.
This means we get splash particles on any surface which is opaque, including vehicles, characters and weapons.
However, we didn’t necessarily want these splashes to be on the sides of buildings, so we incorporated a slope factor.
Another problem was that we weren’t getting enough splashes because not every particle that we checked for collision would generate a splash.
So, we spawned more particles in a volume around the camera and snapped them to the depth buffer
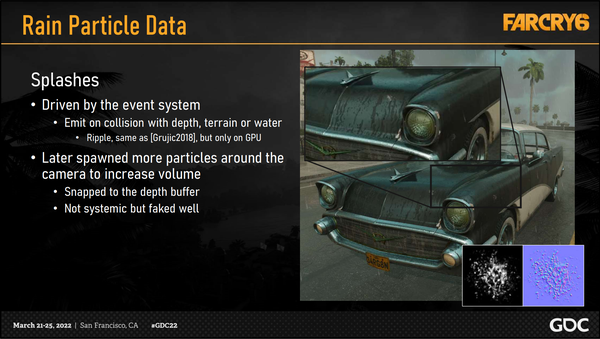
下一个要分析的粒子效果是雨点打在表面时产生的水花。
最初,这只是由 GPU 粒子事件系统驱动的,当父粒子撞击到深度缓冲区、地形或水面上的某个表面时,该系统就会发射新粒子。
这意味着可以在任何不透明的表面上获得飞溅粒子,包括车辆、角色和武器。
但 FC 团队并不希望这些飞溅粒子出现在建筑物的侧面,因此加入了 slope factor。
另一个问题是,场景中的飞溅粒子效果并不多,因为并不是检查碰撞的每个粒子都会产生飞溅效果。
因此在摄像机周围的 volume 中生成了更多粒子,并将它们捕捉到深度缓冲器上(所以又在相机周围加了额外的雨水粒子)
For both the rain streaks and splashes we wanted pixel lighting, especially at night. However this was too expensive and vertex lighting wasn’t good enough.
What we did was create a system for generating spherical harmonic light probes for each vertex of the particle. Each of these probes calculates 3rd order SH coefficients and incorporates sun, point and spot lights.
This gives us better than vertex lighting but much cheaper than pixel lighting. In addition, we can sample the normal maps of particles for more directional lighting and better specular highlights.
Here we see an example of this with a particle billboard of a sphere on the right with only a diffuse and normal texture.
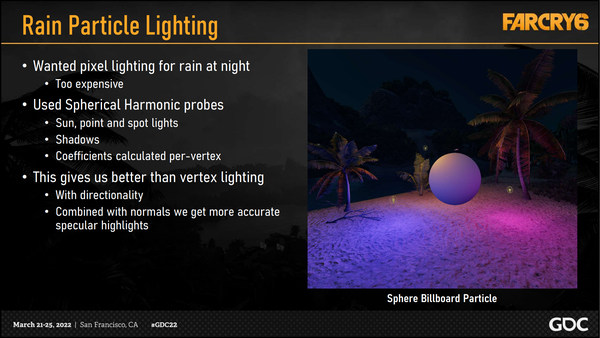
对于雨滴和水花,团队最开始都希望采用 pixel lighting,尤其是在夜间。但这样做成本太高,尝试使用顶点照明效果也不够好。
后续的做法是创建了一个系统,为粒子的每个顶点生成球谐函数光照探针。每个探测器都会结合太阳光、点光源和聚光灯计算三阶球谐函数系数。
这样就能获得比顶点照明更好的效果,但比像素照明的消耗更小。此外还可以对粒子的法线贴图进行采样,以获得更具方向性的照明和更好的镜面高光。
上图是一个例子,右侧是一个球体的粒子 billboard,只有漫反射和法线纹理。
The next particle effect we needed was lightning bolts for our thunderstorms.
For this effect we created a ribbon (or trail) system. We started by creating trails automatically left by individual particles, but then extended this by generating particles and tessellating the geometry between each particle. We called these linked emitters.
Using the linked system, we emitted particles in a cylinder moving from top to bottom, increasing the turbulence in the center of the volume and fading it out at each end.
But this alone was not very realistic – we needed to make the lightning affect the world around it.
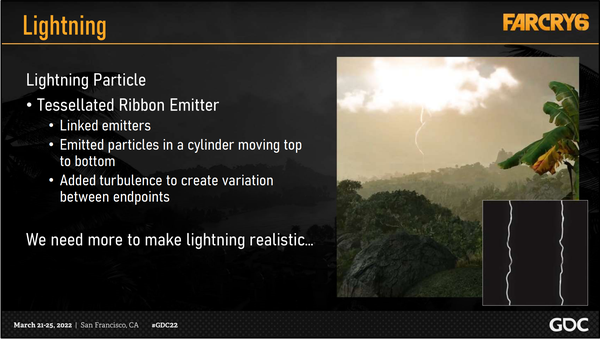
下一个要分享粒子效果是雷暴中的闪电。
为此,FC 团队创建了一个 ribbon(或 trail)系统(Tessellated Ribbon Emitter 系统)。首先创建了由单个粒子自动留下的轨迹,然后通过生成粒子并在每个粒子之间的几何图形上进行细分来扩展这一效果。FC 团队称这些为链接发射器(linked emitters)。
利用链接系统(linked system),FC 团队在一个从上到下移动的圆柱体中发射粒子,增加 volume 中心的扰动,并在两个端点逐渐减弱。
但仅仅这样还不够逼真 – 需要让闪电影响周围的世界。
First, we generated an omni light and placed it in the scene so that the lightning would light the environment.
Then, we had to address the clouds around the lightning bolt.
We applied the lightning to the clouds in the upsample pass so that the lightning doesn’t end up in the history buffer and cause ghosting.
In order to determine where in the clouds to add light, we used the sun scattering factor that we saved in the green channel of the cloud raymarching pass.
Our implementation functions essentially like a column light.
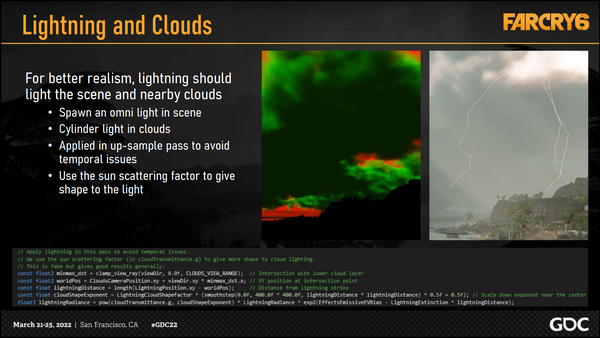
首先生成了一个全方向光源,并将其放置在场景中,这样闪电就能照亮整个环境。
然后需要处理闪电周围的云层。
FC 团队在上采样 pass 里将闪电应用到云层中,这样闪电就不会出现在 history buffer 中,也不会造成重影。(不然会因为 Temporal Filter 产生鬼影,详见上方代码)
为了确定在云层的哪个位置添加光源,使用了保存在云的 raymarching pass 的绿色通道中的 sun scattering factor。
实现的功能基本上与柱状光(column light)类似。
3.8 海洋
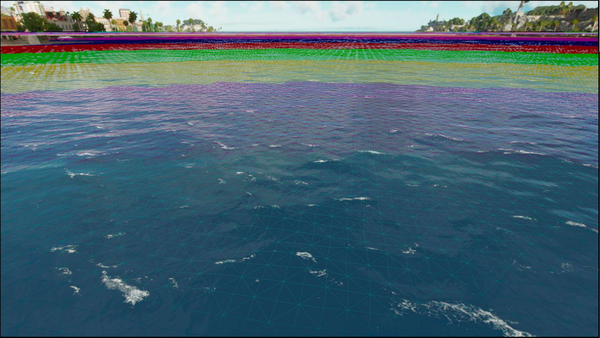
The next rendering feature is the ocean. The improvements we made to the ocean rendering were mostly to support the tropical environment.
However, the ocean still needed to be affected by weather in two ways, Beaufort level and wind direction.
Our previous screen space tessellation had issues with shoreline waves whenever the ocean was parallel to the view direction. It also lacked a lot of detail in the distance.
For more information on our previous implementation see our previous GDC talk on water rendering.
So, we added a new type of tessellation to support sharp waves for the weather, improve the distance visual, and support shoreline waves.
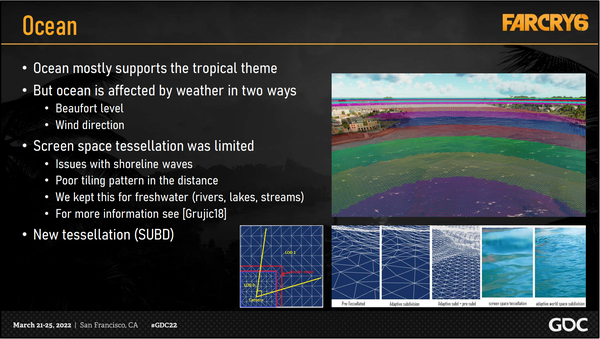
下一个要介绍的渲染特性是海洋。对海洋渲染的改进主要是为了支持热带环境。
不过,海洋仍然需要受到天气的两种影响,即蒲福风级(Beaufort level)和风向。
先前的屏幕空间几何细分(screen space tessellation)在海岸线波浪上有一些问题,不管海洋是不是和视线方向平行。此外,它还缺乏大量的远景细节。(就是远距离看 Tiling 图案太明显了,所以 Screen Space Tessellation 只拿来做淡水效果)
有关之前对于水渲染的实现的更多信息,可以参阅 FC 团队之前在 GDC 上关于水渲染的演讲。
因此添加了一种新的细分类型,以支持某些天气中的比较 “尖锐” 的波浪,改善距离视觉效果,并支持海岸线波浪
The tessellation we chose for our ocean was based on the iSubD tessellation scheme.
The basic algorithm subdivides the ocean mesh from a single two triangle quad down to the subdivided triangles you see near the camera.
It is a progressive refinement algorithm that will subdivide into smaller triangles each frame as they get closer to the camera and merge triangles into larger ones as they get further away.
海水的话用了一种新的 Tessellation 技术是基于 iSubD 的细分框架(opengl 参考源码:opengl-framework/demo-isubd-terrain/isubd-terrain.cpp)。
该方法就是在三角形上找中线不断划分。这个算法是渐进式的,每一帧都会按照相机距离不断地进行细分和合并,离摄像机越来越近时,会合并为更小的三角形,而当它们离摄像机越来越远时,又会合并为更大的三角形。可以看到图中离相机最近的部分每个 Quad 有四个三角形,紫色的部分就只有两个三角形了。
There is a performance limit on the number of operations that can be done every frame, so we filled a buffer with keys to perform these operations, but this led to a list with lots of empty space.
This was an area of the Subd algorithm that we found to be unsolved, and we were able to use the same prefix sum algorithm from the GPU particle filtering on a different type of data set.
In our world, we have freshwater that meets the ocean, and therefore we needed to blend the previous screen space tessellation with the subd tessellation.
To do this, we used the displacement and normals of the freshwater as an input at the intersections of these do tessellation types and blended in that range. We then used simple stencil testing to avoid redundant pixel shading of the water meshes.
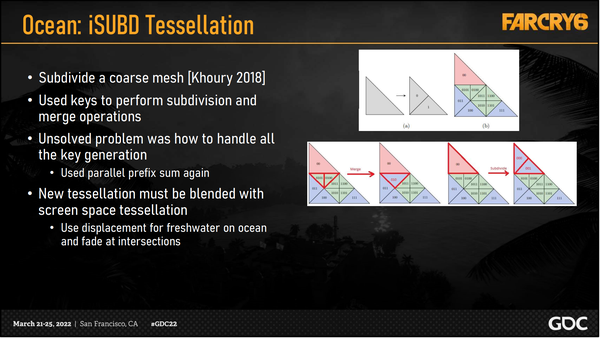
每帧可执行的操作数量受到性能限制,因此我们在缓冲区中填充了一些 key(这里应该指的是编号?)来执行这些操作,但这导致列表中存在大量空白空间。
这是我们发现 Subd 算法尚未解决的一个问题,这里可以在不同类型的数据集上使用 GPU 粒子过滤中用过的前缀和算法。
在 FC6 中以及现实世界中,有淡水与海洋交汇的现象,因此需要将之前的屏幕空间细分( Screen Space Tessellation )与 Subd 细分相融合。
为此,我们使用淡水的位移和法线作为这两种细分类型交叉点的输入,并在该范围内进行混合。然后,使用模版测试来避免对水网格进行多余的像素着色。(对水面做 Displacement 并且在交界处做过渡)
细分和合并的控制是用编号来做的,可以看到图中的灰色三角形,在细分之后会变成 01 两个三角形,一直细分下去就会得到图中这些带编号的三角形。然后每两个三角形合并就会减少一位(这里的位值编码比特的位数,例如 001 和 000 变成 00,有点像哈夫曼树)。
The Beaufort scale is an empirical system that relates wind speed to its effect on bodies of water. 蒲福风级是一个经验系统,它将风速与其对水体的影响联系起来。
Here we will show how the Beaufort levels coming from the weather manager can impact the look of the water. 接下来将展示 weather manager 中的蒲福风级对水面的影响
This is Beaufort level 0. 下面是 0 级水的表现
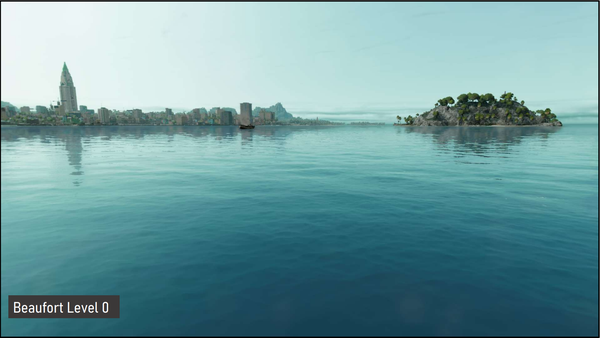
The Beaufort levels themselves are tuned with data such as wind speed, amplitude, scale and choppiness. 蒲福风级本身是根据风速、振幅、尺度和湍急度等数据调整的。
Here we have Beaufort level 1… 下面是 1 级水的表现
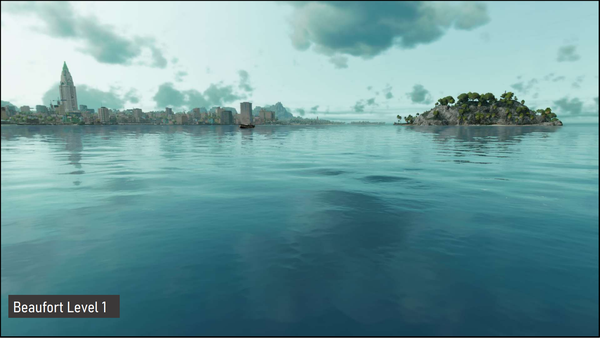
These values are used to drive the wave simulations we will show later. 后面会展示用于驱动波浪模拟的值。
Here we have Beaufort level 2 下面是 2 级水的表现
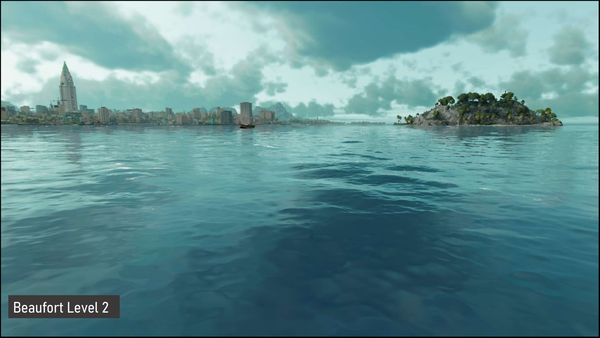
The Beaufort levels also include settings for the shoreline waves, such as amplitude, frequency, speed, steepness and number of waves. 蒲福风级还包括对海岸线波浪的设置,如振幅、频率、速度、陡度和波浪数量。
Here is Beaufort level 3 下面是 3 级水的表现
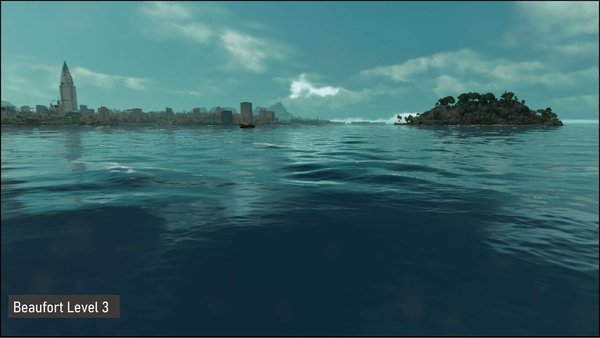
The Beaufort levels include settings for foam, which you can see accumulating alongside the increased wave size. 蒲福风级还包括对泡沫的设置,可以看到泡沫随着波浪的增大而累积。
And this is Beaufort level 4. 下面是 4 级水的表现

Here we have the ocean wave buffers that we generate every frame in order to create motion in the waves.
These buffer can be mapped back and read on the CPU for physics calculations and ocean level, but we disabled this due to performance limits.
The world space fbm was created to get sharp waves up-close near the camera.
Using a world space buffer gave us the ability to generate a normal directly, instead of from screen space like we did previously.
This gave us better details up close as well as in the distance with mip mapping.
Next, we used the FFT simulation for waves in the distance.
We adjusted our original implementation to respond to the Beaufort level and wind parameters.
We also added an accumulation channel to the texture to create persistent white caps on the waves.
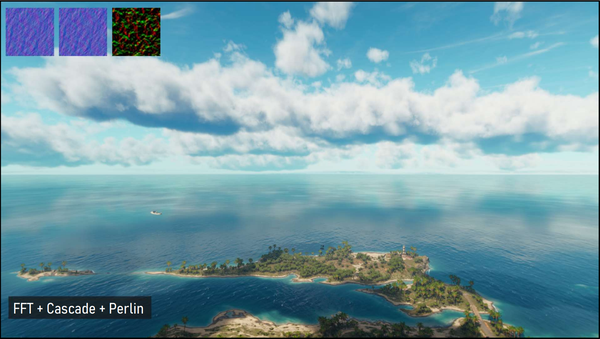
To prevent tiling in the distance, we use the FFT buffer as a cascade at a different scale, as well as a Perlin noise wave texture.

在这里,我们每帧都会生成 wave buffer,以创建海浪的运动。
这些 buffer 可以被映射回 CPU 上,或者在 CPU 上读取读取,用于物理计算和海洋水平,但由于性能限制,最终没有这样做。
创建世界空间 fbm(fractional brownian motion)的目的是为了在摄像机附近捕捉清晰的” 尖锐 “波浪。
使用世界空间 buffer 能够直接生成法线,而不是像以前那样从屏幕空间生成法线。
这让我们在近距离和远距离使用 mip map 时都能获得更好的细节。(两张 World Space 的 FBM 纹理,用来在相机附近产生尖锐的波浪,之所以用世界空间是因为可以直接从 Displacement Texture 生成 Normal Texture,这样可以获得更好的细节。)
接下来,使用 FFT 模拟来处理远处的波浪。
FC 团队调整了最初的实现,以响应 weather manager 中的蒲福风级和风力参数。
FC 团队还在纹理中添加了一个累积通道,以在波浪上创建持久的波峰碎白浪花。
为了防止在远处出现重复效果的平铺现象,FC 团队使用不同尺度的 FFT 缓冲区级联以及 Perlin 噪音波纹理。(两张 FFT 纹理可以受到天气系统风参数的影响,另外为了防止远处看起来 Tilling 重复明显,留了一个通道做累加,然后使用的时候还会拿两张 FFT 做 Cascade 并叠加 Perlin 噪声,进一步降低重复度)
Here we see only the FFT buffer we started with. 这是最初的 FFT 效果
Notice the tiling in the distance. 可以看到远处的 tiling 效果
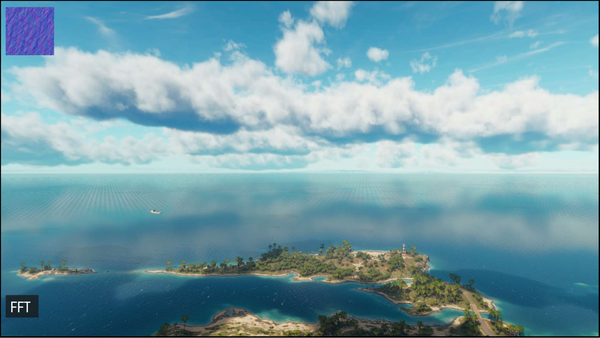
Then we have the FFT cascade eliminating some of the tiling. 接着使用了多级 FFT 叠加来消去了一些重复
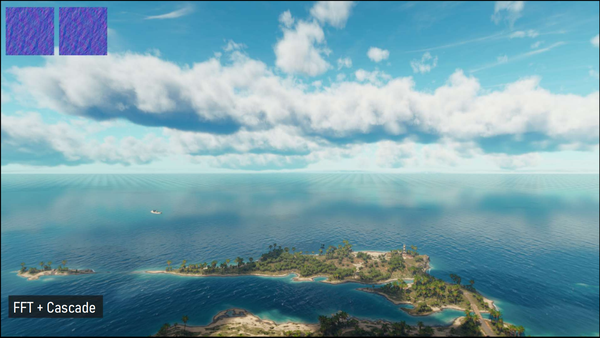
And finally we have the scrolling Perlin noise based texture removing the rest of the tiling. This does a good job simulating the effect of wind on large patches of water in the distance. 最后使用了基于 Perlin 噪声的滚动纹理去除其余的重复现象。这很好地模拟了风对远处大片水域的影响。
3.9 近岸线海浪与树木弯曲
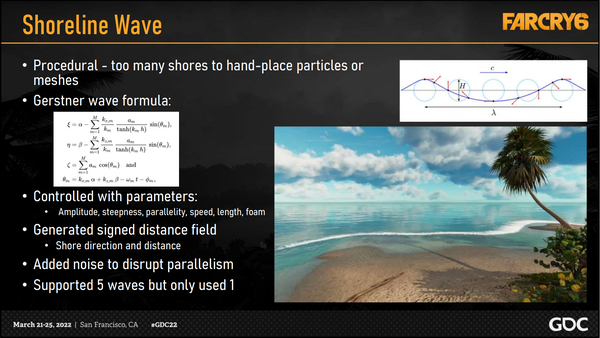
Related to the new ocean tech was the inclusion of shoreline waves, since we needed them for our tropical beaches.
We had far too many shorelines to cover so we needed a procedural method, which led us to choose the Gerstner wave formula.
In order to place and move these waves properly we needed to generate a signed distance field from the ocean to the shore to derive direction.
We used parameters such as amplitude, speed, and foam to control the visuals.
We also added a noise parameter to the waves that helps break up the parallelism of the wave, otherwise we would have perfect circular waves approaching our islands.
Our system supported multiple waves, but we only used one in the final game.
与新的海洋技术相关的是海岸线波浪的加入,因为热带海滩需要波浪。
由于游戏地图有太多的海岸线需要覆盖,因此需要一种程序化的方法,这让我们选择了 Gerstner wave 公式。
为了正确放置和移动这些波浪,需要生成一个从海洋到海岸的有符号距离场来推导方向。
最后的方法使用振幅、长度、陡度、平行度、速度和泡沫等参数来控制视觉效果。
团队还为波浪添加了噪音参数,有助于打破波浪的平行度,否则我们就会看到完美的圆形波浪接近我们的岛屿。
团队设计的系统支持多个波浪(5 个),但在最终游戏中只使用了一个。
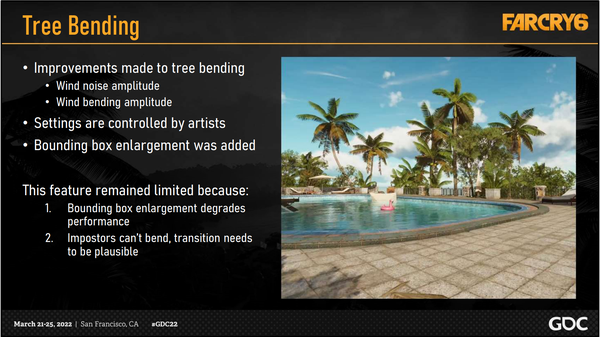
The last rendering feature we’d like to talk about is tree bending, which works in conjunction with the wind direction and magnitude that comes from the weather manager.
We improved the tree bending settings by adding noise and bending amplitudes. Combined with the wind values, this gives us exaggerated movement in the trees that reflects our stormy weather conditions.
These settings are controlled by artists when setting up the trunk skeletons.
The movement could sometimes exceed the tree’s bounding box however, which was problematic because leaves could suddenly get culled and disappear. To fix this, we also included settings to enlarge the bounding box.
Ultimately, this feature was still rather limited because:
One - the bounding box enlargement affected performance, with more trees staying visible each frame.
and Two – Our distant tree impostors cannot bend, so the movement up-close still needs to allow for an acceptable transition.
要谈的最后一项渲染特性是树木弯曲,它与 weather manager 提供的风向和风力大小配合使用。
通过添加噪音和弯曲幅度改进了树木弯曲的预设。与风力值相结合,可以使树木产生夸张的运动,从而反映出暴风雨的天气状况。
这些设置由美工人员在设置树干骨架时控制。
不过,运动有时会超出树木的 bounding box,这是个问题,因为树叶可能会突然被剔除并消失。为了解决这个问题,我们还加入了放大 bounding box 的设置。
最终,这一功能仍然相当有限,因为
其一 - 边界框的放大会影响性能,因为每一帧都会有更多的树木可见。
其二 – 我们远处的假树无法弯曲,因此近处的移动仍需要允许可接受的过渡。
4. 总结
For me, things that really drove our success were limiting complexity, studying references, reducing production dependencies wherever possible, and identifying the biggest wins so that we could focus on what ‘sells’ the weather the most.
For future work, we could simplify the database further, set up an easier way to debug and review weather without overrides confusing us, make more use of wetness effects, push our presets to be more extreme, and investigate procedural weather patterns as opposed to our hardcoded forecasts.
For rendering takeaways, as you saw there was a lot of tech to maintain.
There were many interlocking parts, which needed to be polished both separately and together.
And finalize these things early! That means your data formats, data and processes. You don’t want these changing too far into production.
For future work there are several things listed but I think the most interesting to me would be to use the same tessellation for both water and terrain and use the same atlas and virtual texturing.
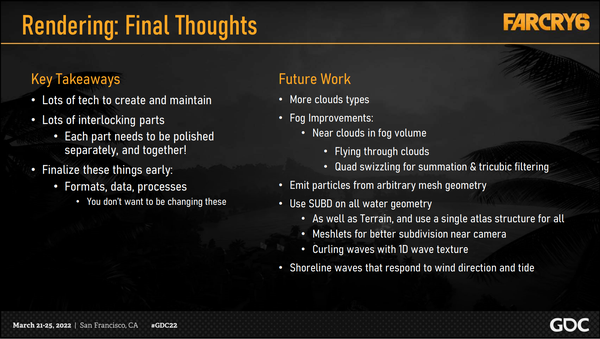
对 Colin 来说,真正推动他们取得成功的是限制复杂性、研究参考资料、尽可能减少生产依赖性(许多部分都是联动的,每一个都需要打磨,最后还要合并到一起,而且在打磨时可能会互相影响),以及识别其中能带来特性的最关键部分,这样就能专注于最 “卖座” 的天气。
ppt 中还提到。格式,数据,流程最好早一些确定,否则后面改起来非常麻烦。
在未来的工作中,他们准备进一步简化数据库,建立一种更简便的方法来调试和复核天气的设置,而不会被经常的重写所迷惑,更多地使用湿度效果,将预设推向更极端,并研究程序化的天气模式,而不是硬编码的预报。
ppt 中也写到:
- 要混合云的类型,提升雾的品质(在近处的 fog volume 中的云;支持在云中飞行;搞出一个用于求和与三方滤波的 quad swizzle 技术,这个估计和 raymarching 和棋盘渲染有关系)
- 让粒子系统支持发射任意 mesh(我:强大的 Niagara!什么时候支持 gpu 事件!)
- 在所有的水体上支持 SUBD 细分,地形上也要使用这个技术,并且只用一个图集;并且要对相机近处支持更多的细分;在 1 维的 wave 纹理中进行波浪的卷曲
- 海岸线的波浪也要支持对风的控制和潮汐的控制
附录
This is what the raymarching looks like in pseudocode: raymarching 的伪代码
When calculating the irradiance based on the single and multiscattering from the ray-marching 单反射和多反射的 irradiance 计算
And this is the optimized phase function we used in the previous lighting function. 最终使用的优化后的相位函数
We used this in the fog as well 雾里也用的是这个
翻译之后本人感叹:图程真不是一般人能当的!物理,代数,几何,底层,硬件使用,数分,概率,算法,缺一不可!敬畏世界上的所有图程!
由于本人水平有限,难免会存在一些错误,请大佬们轻喷,欢迎交流!!
封面来自官网截图 - 孤岛惊魂 6 | 育碧游戏 (ubisoft.com) > 本文由简悦 SimpRead 转码